Bitfocus Companion Setup
Control MuteDeck from Bitfocus Companion: mute and unmute, toggle your camera, screen share and recording, leave a meeting, push-to-talk, and trigger MuteDeck custom actions with button feedback that shows your live meeting status on a Stream Deck, Loupedeck Live S, Companion Satellite, or any other surface Companion drives.
The module is listed in the Companion module store as MuteDeck: bitfocus.io/connections/mutedeck-mutedeck.
If you use a Stream Deck with Elgato's own software, you want the Stream Deck plugin instead. This page is only for Bitfocus Companion.
Requirements
- Bitfocus Companion 4.3 or newer
- The MuteDeck desktop app installed and running on the machine you want to control
- Companion able to reach MuteDeck's WebSocket API on port
3492(on the same machine that islocalhost:3492, no configuration needed)
Installing the module
Since Companion 4.0 modules are downloaded from the module store instead of shipping with Companion, so installing the module and adding a connection is one flow.
- Open the Companion web GUI (the launcher's Open GUI button, or http://localhost:8000).
- Go to the Connections tab and click Add connection.
- Search for MuteDeck and click it.
- In the dialog that appears, pick the module version - Companion offers to install the latest version from the store - and add the connection.
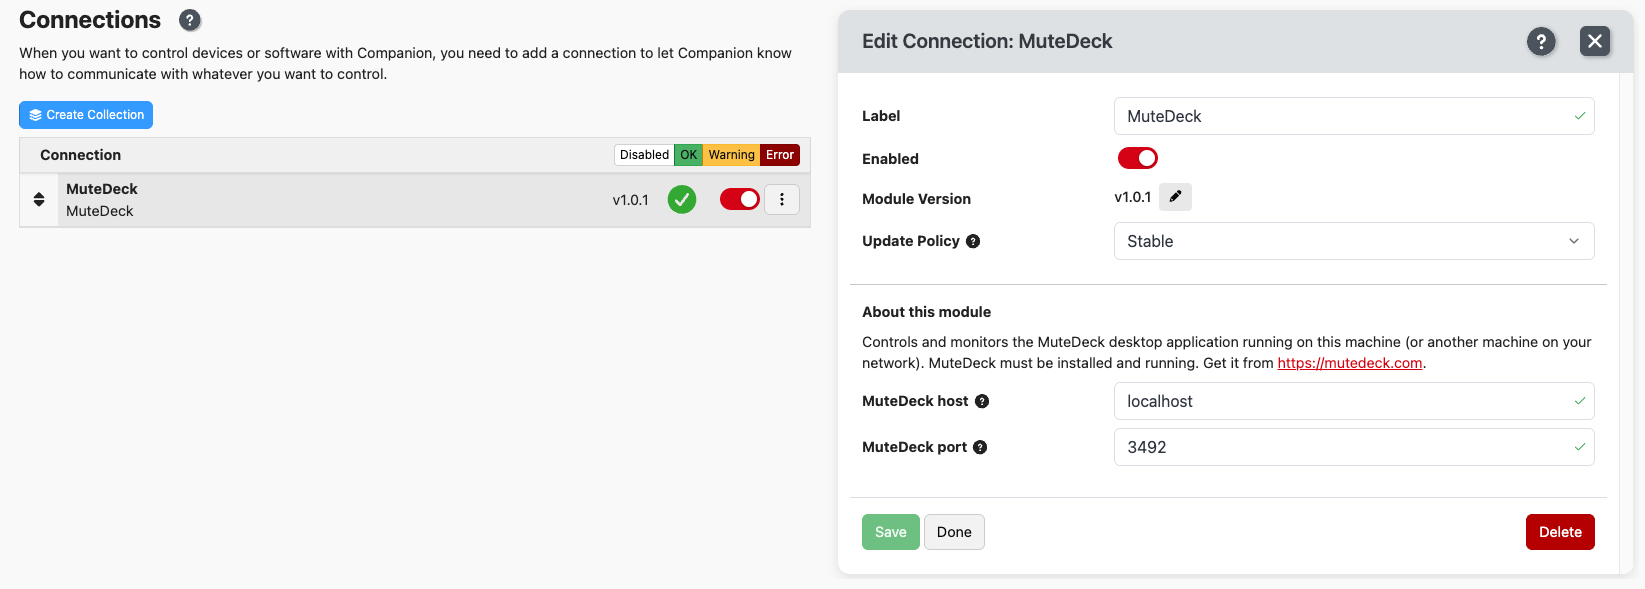
- The connection appears in the list. Click it to open its configuration in the right-hand panel.
If your Companion machine has no internet access, download the module package on another machine and use import module package (.tgz) on the Modules tab instead.
Configuration
| Field | Description |
|---|---|
| MuteDeck host | Hostname or IP where MuteDeck is running. Usually localhost. |
| MuteDeck port | MuteDeck's WebSocket port. Default 3492. |
The defaults work out of the box when Companion and MuteDeck run on the same computer. Click Save after changing anything.
Running Companion on a different machine than MuteDeck (a Raspberry Pi, a Companion Satellite host, or a dedicated control PC) is supported: enter the IP address of the computer running MuteDeck, and make sure MuteDeck has network connections enabled so it accepts requests from outside localhost.
The Status column on the Connections page shows whether the module is connected. It reads OK while MuteDeck is reachable and Connecting while it is not — the module retries every few seconds, so starting MuteDeck later reconnects on its own.
Quick start: the presets
The fastest way to a working page is the presets: complete buttons with icons, actions and feedback already wired up.
- Open the Buttons tab and select the page you want to build.
- In the presets panel, open the MuteDeck connection and then the MuteDeck buttons folder.
- Drag the buttons you want onto the page.
That is the whole setup. The preset buttons use the MuteDeck icons and update live: red when you are muted or recording, green when your camera or screen share is on, and greyed out whenever MuteDeck is not running — so a glance at the deck tells you whether the connection is up.
| Preset | What it does |
|---|---|
| Microphone toggle | Mute/unmute, icon and colour follow your live mute state |
| Camera toggle | Camera on/off |
| Screen share toggle | Start/stop sharing |
| Recording toggle | Start/stop recording |
| Leave meeting | Leaves the call; dimmed while MuteDeck is offline |
| MuteDeck status | Indicator button showing Connected / Offline |
| Push-to-talk (hold to unmute) | Unmutes while held, mutes again on release |
| Bring call app to front | Brings the conferencing app to the foreground |
| Custom action | Triggers a MuteDeck custom action (set the name in the button's action) |
Building your own buttons
If you want your own layout instead of the presets, build a button from scratch:
- In the Buttons tab, click an empty button and choose Create button.
- Under Press actions, click + Add action, pick the MuteDeck connection and then, for example, Microphone: mute / unmute.
- Leave the action's Action option on Toggle (or set it to Mute / Unmute if you want a button that always does the same thing).
- Under Feedbacks, click + Add feedback and add Microphone: live icon. It needs no options: it draws the matching MuteDeck icon and colour for the current state and greys the button out when MuteDeck is offline.
- Press the button on your surface, or use the Test actions button in the editor, to check it.
Prefer your own icons and colours? Skip the live icon feedback and use the boolean feedbacks instead — those only apply a style you choose when a condition is true.
Actions
| Action | Options | Description |
|---|---|---|
| Microphone: mute / unmute | Toggle / Mute / Unmute | Controls your microphone |
| Camera: start / stop | Toggle / Turn on / Turn off | Controls your camera |
| Screen share: start / stop | Toggle / Start sharing / Stop sharing | Controls screen sharing |
| Recording: start / stop | Toggle / Start recording / Stop recording | Controls recording |
| Leave meeting | — | Leaves the current meeting |
| Bring call app to front | — | Brings the active conferencing app to the foreground |
| Trigger custom action | Custom action name | Runs a custom action defined in MuteDeck |
| Refresh custom action list | — | Re-fetches the list of custom actions from MuteDeck |
Actions pressed while MuteDeck is not connected are ignored and logged as a warning in the connection's log.
Feedbacks
Feedbacks are what make a button show your status instead of just sending a command.
Live icon feedbacks: zero configuration, used by the presets. Each one fully styles the button from the current state: Microphone: live icon, Camera: live icon, Screen share: live icon, Recording: live icon. They also grey the button out while MuteDeck is not connected.
Boolean feedbacks: for your own styling. Each has a "When state is" dropdown and applies the style you configure while it matches:
| Feedback | States |
|---|---|
| Microphone state | Muted / Unmuted / No microphone |
| Camera state | On / Off / Disabled |
| Screen share state | On / Off / Disabled |
| Recording state | On / Off / Disabled |
| Call state | In a call / Not in a call / Disabled |
| MuteDeck connection | Connected (invert it to style the offline state) |
"Disabled" means MuteDeck cannot control that function in the app you are currently in. For example, recording in a meeting where you have no recording rights.
Variables
Variables let you put live status into button text or into triggers. The prefix is the connection's label, mutedeck by default, so the microphone label is $(mutedeck:mute_label).
| Variable | Values |
|---|---|
connected | true / false |
connected_label | Connected / Offline |
mute_status | active (muted), inactive (unmuted), disabled (no mic) |
video_status | active, inactive, disabled |
share_status | active, inactive, disabled |
record_status | active, inactive, disabled |
call_status | active (in a call), inactive, disabled |
control_status | active, inactive, disabled — whether MuteDeck can control the current app |
mute_label | Muted / Unmuted / No mic |
video_label | On / Off / Disabled |
share_label | On / Off / Disabled |
record_label | On / Off / Disabled |
call_label | In call / No call / Disabled |
A button with the text Mic\n$(mutedeck:mute_label) shows "Mic / Muted" or "Mic / Unmuted" as you mute and unmute. Before the first status arrives, or while MuteDeck is offline, the _status variables are empty and the _label variables read Unknown.
Push-to-talk
The push-to-talk preset uses two action groups: Press actions sends Unmute, Release actions sends Mute. Hold the button to talk, let go to go back to muted. You can build the same thing on any button by adding the "Microphone: mute / unmute" action twice: once under press with Unmute, once under release with Mute.
Custom actions
Add the Trigger custom action action to a button and pick an action from the dropdown. The list is fetched live from MuteDeck, so your own custom actions show up there, along with the app they apply to. You can also type a name yourself if you prefer.
Created a new custom action in MuteDeck while Companion was running? Use the Refresh custom action list action, or disable and re-enable the connection, to pick it up.
Triggers
Because the module exposes variables and feedbacks, you can also use MuteDeck status in Companion's Triggers: for example, when $(mutedeck:call_status) becomes active, switch your Companion page to your meeting layout, turn on a light over an OSC connection, or set your stream scene. That is the main advantage of Companion over a plain Stream Deck plugin — MuteDeck's status can drive the rest of your rig.
Troubleshooting
Status stays on "Connecting": MuteDeck is not running or is not reachable. Start MuteDeck, and check the host and port in the connection configuration. On the same machine those should be localhost and 3492.
Buttons are grey and do nothing: that is the module telling you it has no connection to MuteDeck. Same fix as above.
Everything shows "Disabled": MuteDeck is connected but does not recognise a supported meeting app, so there is nothing to control. See Supported Apps and App Not Detecting.
Connecting over the network fails: make sure MuteDeck accepts network connections, that port 3492 is open in the firewall on the MuteDeck machine, and that you entered its IP address rather than localhost in the module configuration.
Need more detail: open the connection's popover menu on the Connections page and choose View logs to see what the module is doing, or Help for the module's built-in documentation. For MuteDeck-side logs see Finding MuteDeck Logs.
Related
- Stream Deck Setup — Elgato's own software instead of Companion
- Macro Deck Setup
- Custom Actions
- API Documentation — the REST API behind the same status