Integrating with Home Assistant
MuteDeck can send your meeting status to Home Assistant using webhooks, allowing your smart home to react automatically when your meeting status changes.
For example, you can turn a Philips Hue light red when you join a meeting and turn it off again when the meeting ends. Or use your mute, camera, screen sharing, and recording status to build your own automations.
This guide sets up MuteDeck's meeting states as helpers in Home Assistant, so you can use them in any Home Assistant automation.
Video version
If you prefer to watch a video instead of reading, check out the following tutorial:
Otherwise, continue reading for the step-by-step instructions below. 🙂
Prerequisites
Before getting started, make sure you have:
- MuteDeck installed and running on your computer.
- A working Home Assistant installation that is reachable from the computer running MuteDeck.
- Any smart devices you want to control already configured in Home Assistant.
For this example, we'll use a smart light as a busy light: it turns on when a meeting starts and turns off when the meeting ends.
How the integration works
MuteDeck can send a webhook whenever your meeting status changes. The webhook contains the current state of your meeting, including whether you're in a call, muted, sharing your screen, recording, or using your camera.
A webhook from MuteDeck looks similar to this:
{
  "call": "active",
  "control": "google-meet",
  "mute": "inactive",
  "record": "inactive",
  "share": "inactive",
  "video": "active"
}
We'll create a Home Assistant webhook that receives these updates and stores the values in Home Assistant helpers.
The end result looks like this:
MuteDeck
    ↓
Home Assistant webhook
    ↓
MuteDeck Call     = active
MuteDeck Control  = google-meet
MuteDeck Mute     = inactive
MuteDeck Record   = inactive
MuteDeck Share    = inactive
MuteDeck Video    = active
    ↓
Your Home Assistant automations
Once the states are available in Home Assistant, you can use them like any other entity.
Creating the MuteDeck helpers
First, we'll create somewhere to store the meeting status that MuteDeck sends.
In Home Assistant:
- Open Settings → Devices & services → Helpers.
- Click Create helper.
- Select Text.
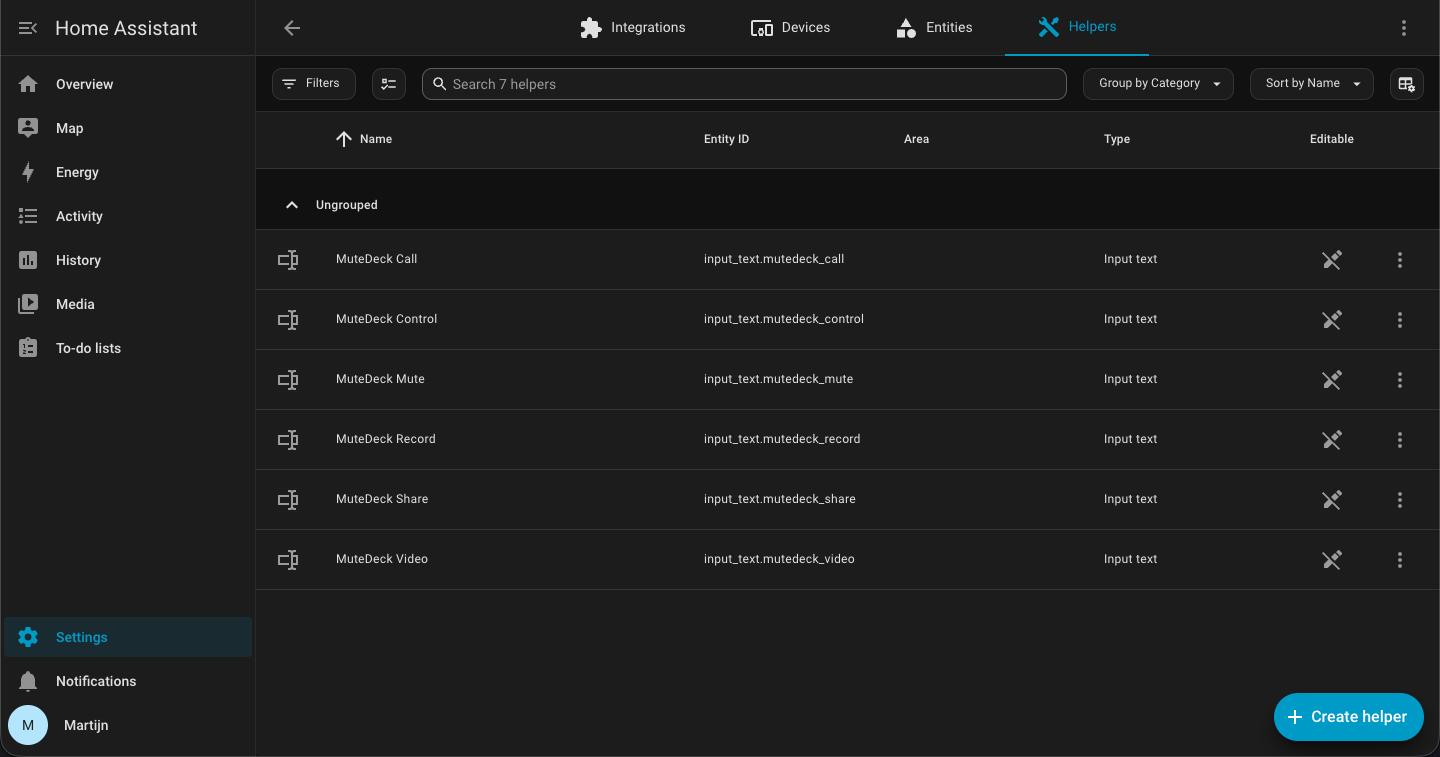
- Create a helper named MuteDeck Call.
- Repeat this for the other MuteDeck states you want to use.
To make the complete MuteDeck status available, create the following helpers:
| Helper | Entity ID |
|---|---|
| MuteDeck Call | input_text.mutedeck_call |
| MuteDeck Control | input_text.mutedeck_control |
| MuteDeck Mute | input_text.mutedeck_mute |
| MuteDeck Record | input_text.mutedeck_record |
| MuteDeck Share | input_text.mutedeck_share |
| MuteDeck Video | input_text.mutedeck_video |
You don't have to create all of them. For example, if you only want to know whether you're currently in a meeting, MuteDeck Call is enough.
Alternative: create the helpers using YAML
If you manage your Home Assistant configuration using YAML, you can create all of the helpers at once.
Add the following to configuration.yaml:
input_text:
  mutedeck_call:
    name: MuteDeck Call

  mutedeck_control:
    name: MuteDeck Control

  mutedeck_mute:
    name: MuteDeck Mute

  mutedeck_record:
    name: MuteDeck Record

  mutedeck_share:
    name: MuteDeck Share

  mutedeck_video:
    name: MuteDeck Video
Restart Home Assistant after changing configuration.yaml, or reload the configuration from Settings → Tools → Reload 'All YAML configuration'. The resulting entities are the same as when creating the helpers manually.
Creating the webhook automation
Next, we'll create the automation that receives MuteDeck's webhook and updates our helpers.
Go to Settings → Automations & scenes and create a new automation.
Give it a name such as:
MuteDeck - Receive meeting status
Add the webhook trigger
Under When, add a Webhook trigger.
Home Assistant will provide a unique webhook ID. Keep this ID private: anyone with the webhook ID who can reach your Home Assistant instance can trigger the automation. In this example, I've used mutedeck_receive_meeting_status as the webhook ID.
Allow the POST method, which is what MuteDeck uses to send the meeting status.
If MuteDeck and Home Assistant are on the same local network, you can leave Only accessible from the local network enabled.
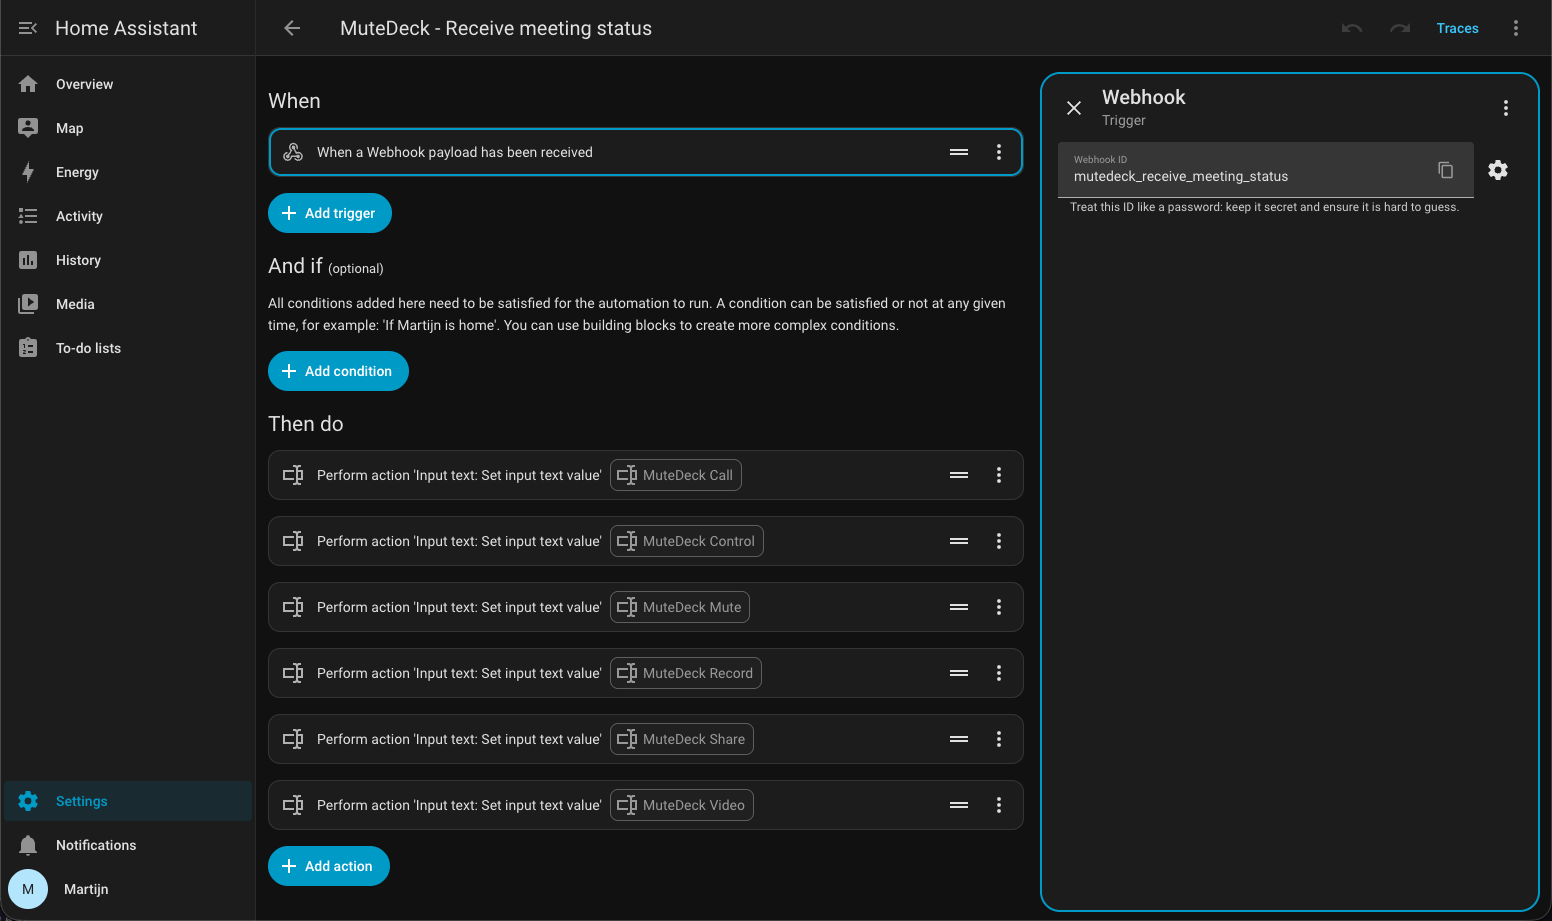
Your webhook URL will look like:
http://HOME-ASSISTANT:8123/api/webhook/mutedeck_receive_meeting_status
For example, if your Home Assistant server is available at 192.168.1.50:
http://192.168.1.50:8123/api/webhook/mutedeck_receive_meeting_status
We'll add this URL to MuteDeck shortly.
Updating the MuteDeck helpers
When Home Assistant receives the webhook, the JSON sent by MuteDeck is available to the automation as trigger.json.
For example:
trigger.json.call
trigger.json.mute
trigger.json.video
Now add an action to update each helper.
For MuteDeck Call, add an Input text: Set action, select the input_text.mutedeck_call entity, and use this as its value:
{{ trigger.json.call }}
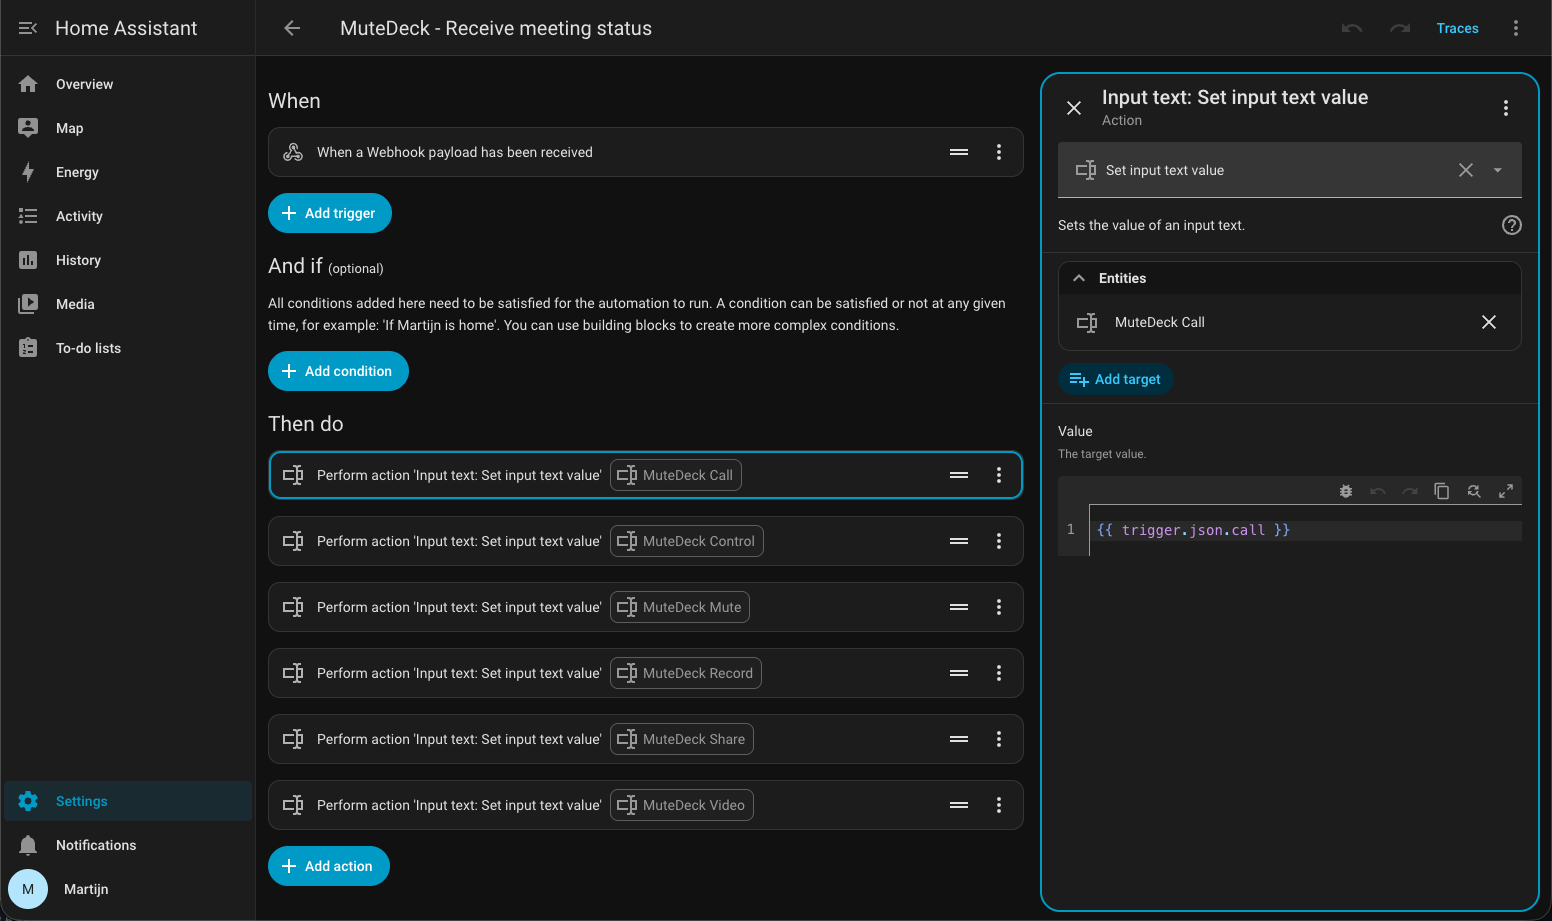
Repeat this for the remaining helpers:
| Helper | Value |
|---|---|
| MuteDeck Call | {{ trigger.json.call }} |
| MuteDeck Control | {{ trigger.json.control }} |
| MuteDeck Mute | {{ trigger.json.mute }} |
| MuteDeck Record | {{ trigger.json.record }} |
| MuteDeck Share | {{ trigger.json.share }} |
| MuteDeck Video | {{ trigger.json.video }} |
Save the automation.
Alternative: create the webhook automation using YAML
If you prefer YAML, the entire receiver automation can be added to automations.yaml:
- id: mutedeck_receive_meeting_status
  alias: MuteDeck - Receive meeting status
  triggers:
    - trigger: webhook
      webhook_id: YOUR_WEBHOOK_ID
      allowed_methods:
        - POST
      local_only: true

  actions:
    - action: input_text.set_value
      target:
        entity_id: input_text.mutedeck_call
      data:
        value: '{{ trigger.json.call }}'

    - action: input_text.set_value
      target:
        entity_id: input_text.mutedeck_control
      data:
        value: '{{ trigger.json.control }}'

    - action: input_text.set_value
      target:
        entity_id: input_text.mutedeck_mute
      data:
        value: '{{ trigger.json.mute }}'

    - action: input_text.set_value
      target:
        entity_id: input_text.mutedeck_record
      data:
        value: '{{ trigger.json.record }}'

    - action: input_text.set_value
      target:
        entity_id: input_text.mutedeck_share
      data:
        value: '{{ trigger.json.share }}'

    - action: input_text.set_value
      target:
        entity_id: input_text.mutedeck_video
      data:
        value: '{{ trigger.json.video }}'

  mode: restart
Replace YOUR_WEBHOOK_ID with your webhook ID before using the configuration.
If your automations.yaml is included from configuration.yaml, remember that the file contains a list of automations. The - id: at the beginning is therefore important.
Reload your automations or restart Home Assistant after making the change.
Configuring the webhook in MuteDeck
Now that Home Assistant is listening for MuteDeck, we can connect the two.
- Open MuteDeck.
- Open Settings.
- Navigate to the Notification settings.
- Enable webhook notifications.
- Enter the Home Assistant webhook URL you created earlier.
Your URL should look similar to:
http://192.168.1.50:8123/api/webhook/YOUR_WEBHOOK_ID
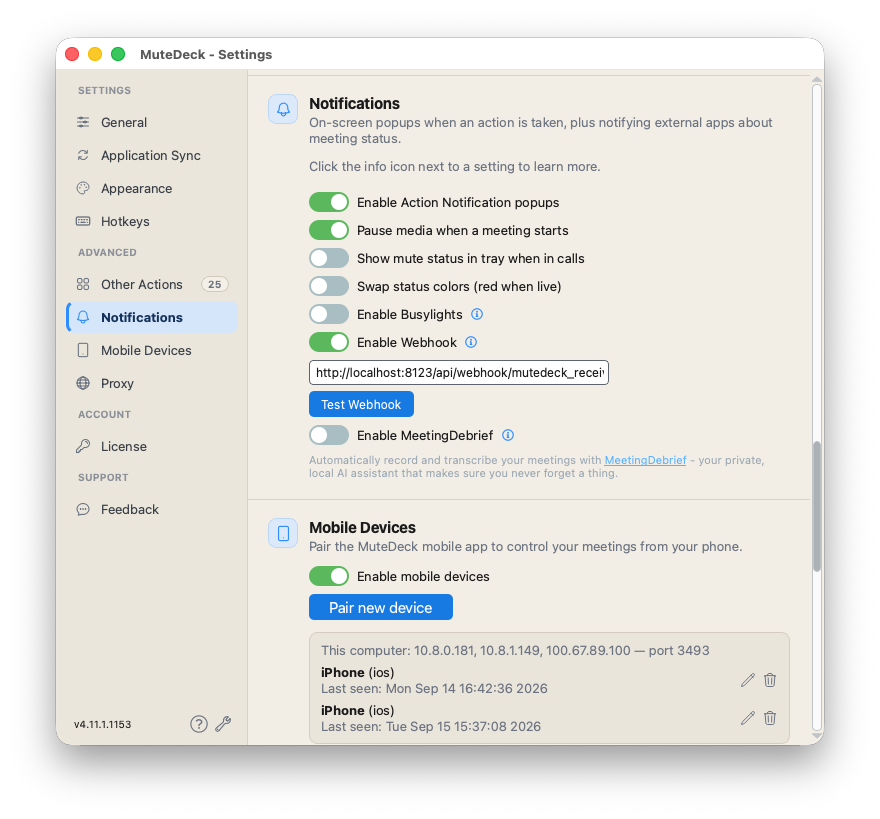
MuteDeck will now send the current meeting status to Home Assistant whenever one of the supported meeting states changes.
Testing the integration
Join a meeting in one of the meeting applications supported by MuteDeck.
Then open Settings → Tools → States in Home Assistant and search for mutedeck.
You should see states similar to:
input_text.mutedeck_call       active
input_text.mutedeck_control    google-meet
input_text.mutedeck_mute       inactive
input_text.mutedeck_record     inactive
input_text.mutedeck_share      inactive
input_text.mutedeck_video      active
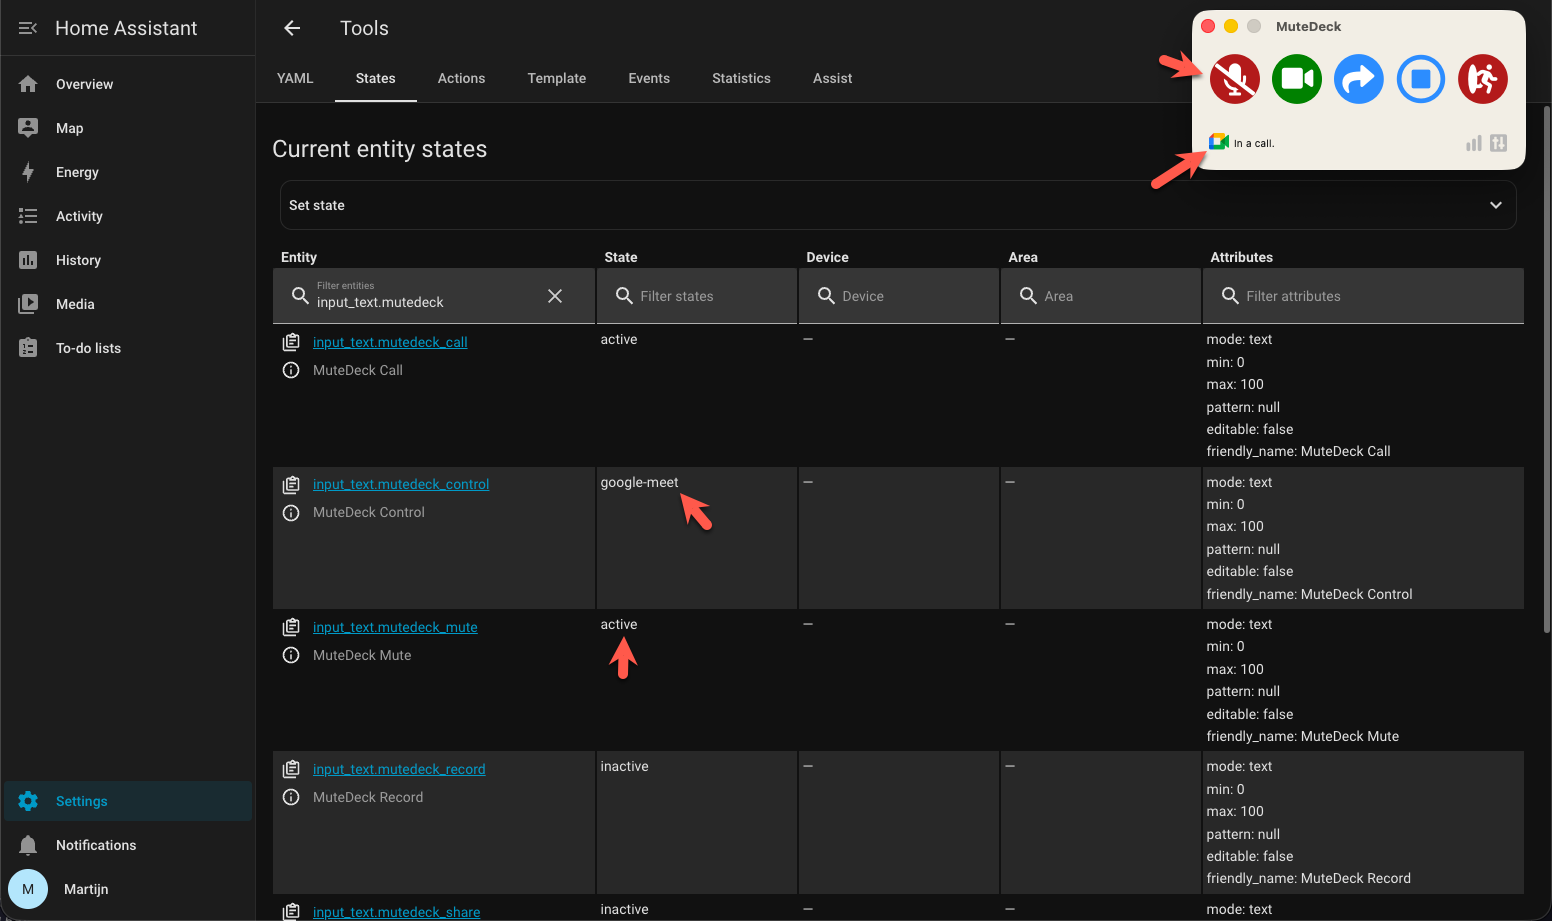
Try muting yourself, turning your camera off, or leaving the meeting. The corresponding entities in Home Assistant should update automatically.
Once that's working, the connection between MuteDeck and Home Assistant is ready!
Creating an automation from your meeting status
Now for the fun part.
Because the MuteDeck status is stored in normal Home Assistant entities, you can use it in your automations just like any other Home Assistant state.
For this example, we'll turn a light on when a meeting starts.
Create a new automation and add MuteDeck Call as the trigger.
Configure it to run when the value changes to:
active
Then add a Light: Turn on action and select the light you want to use.
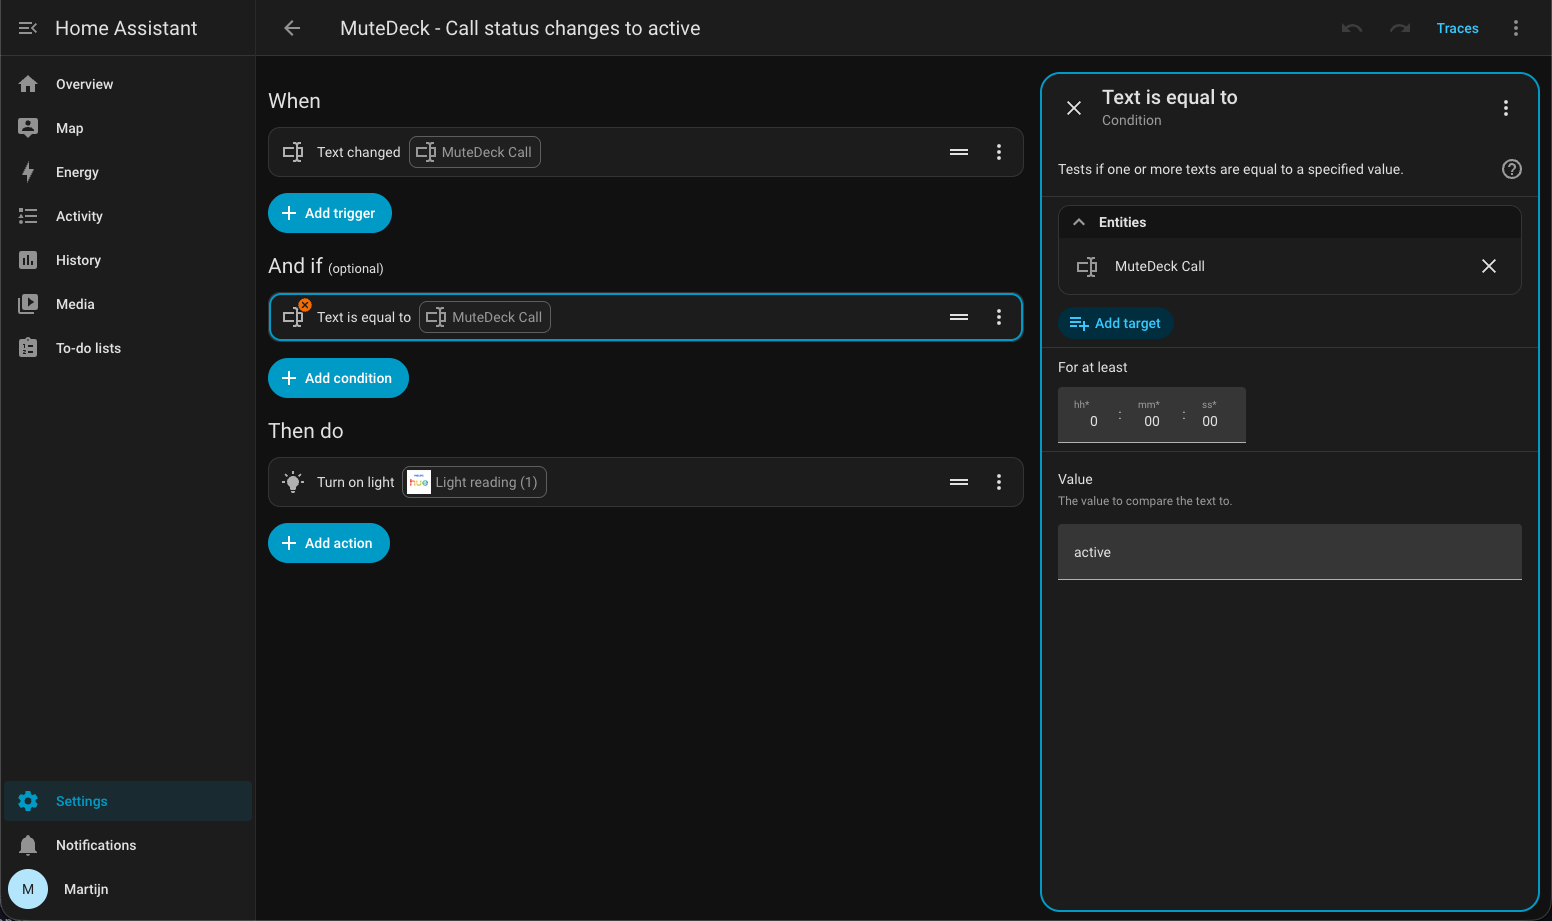
Save the automation.
Next, create another automation using the same MuteDeck Call entity, this time checking for:
inactive
Add a Light: Turn off action.
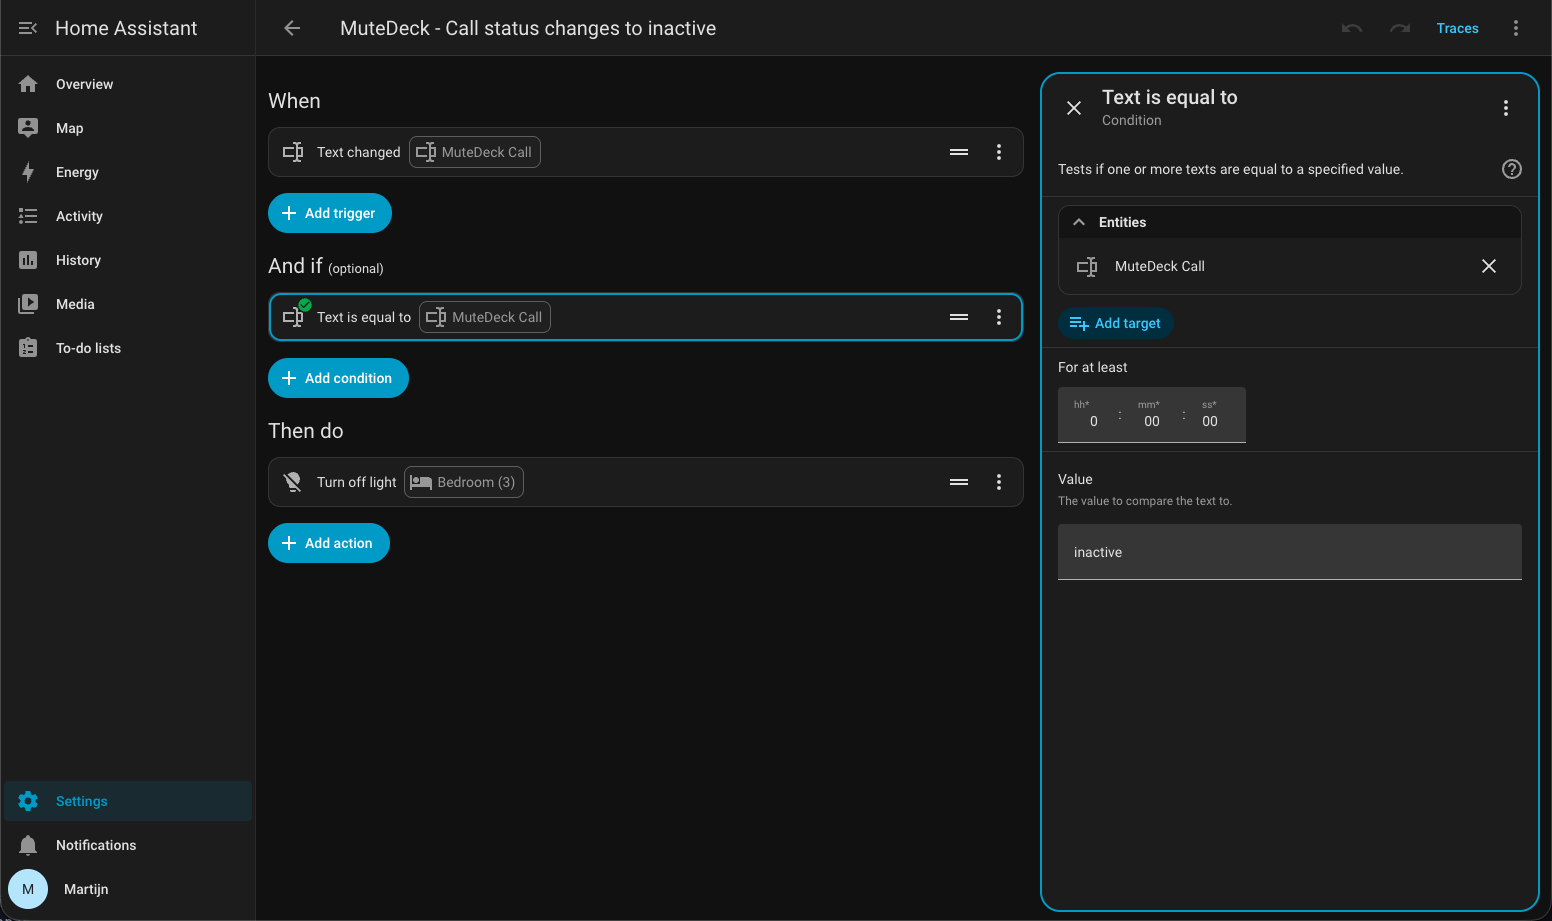
Now join a meeting.
Your light should turn on automatically.
Leave the meeting, and it should turn off again.
You have your own Home Assistant-powered busy light!
Taking it further
Turning a light on and off is just one example. Once MuteDeck's status is available inside Home Assistant, you can use any of the meeting states in your own automations.
For example:
- Turn a light red whenever you're in a meeting.
- Change the light to another color when you're muted.
- Show your meeting status on a Home Assistant dashboard.
- Turn on a physical "Do not disturb" sign outside your office.
- Close blinds when your camera turns on.
- Trigger scenes when screen sharing or recording starts.
- Combine your meeting status with presence, time of day, or other Home Assistant conditions.
MuteDeck keeps the meeting status up to date, while Home Assistant decides what should happen with it. That means you can build the automation around whatever devices and integrations you already use.