Macro Deck Setup
Control MuteDeck from Macro Deck: toggle your microphone, camera, screen share and recording, leave meetings, and trigger MuteDeck custom actions — with live status variables to drive your button states.
Requirements
- Macro Deck 2.15.0 or newer
- The MuteDeck desktop app running on the same machine (or reachable over the network)
Installation
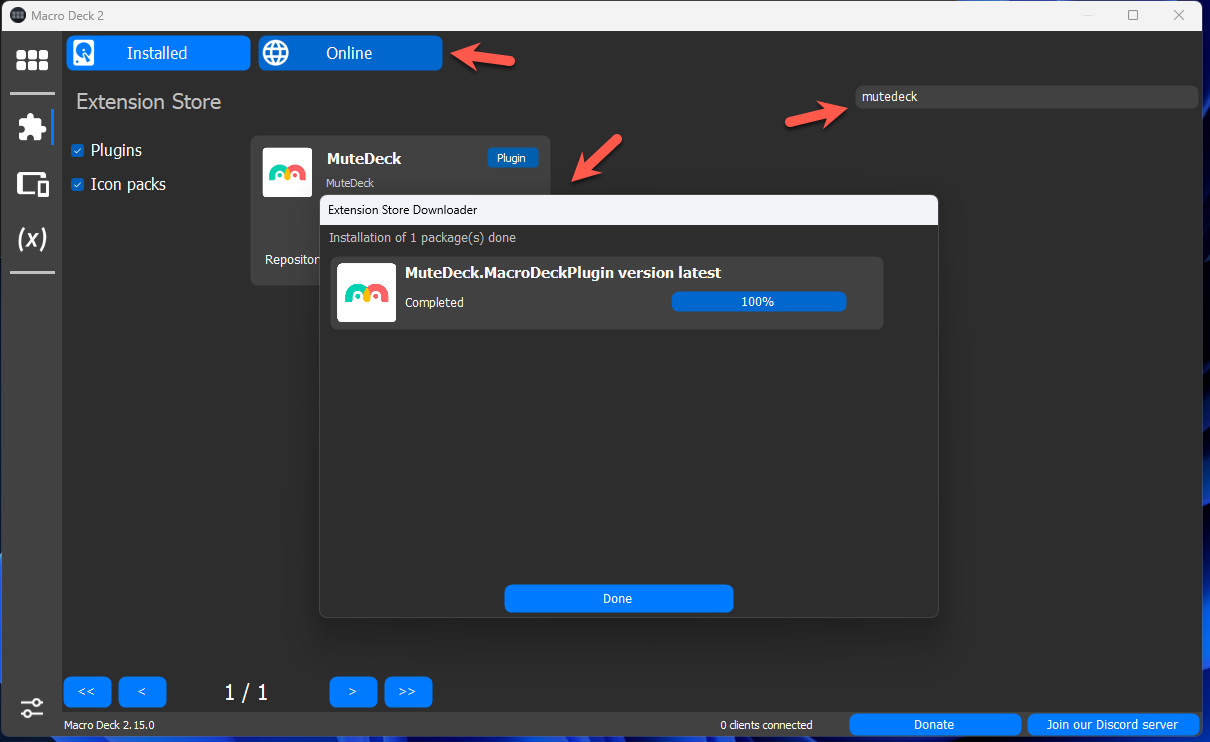
The MuteDeck plugin is available in the Macro Deck Extension Store. Open Macro Deck, then click the Extension Store on the left (the puzzle icon), search for "MuteDeck" and click Install.
Actions
| Action | Description |
|---|---|
| Microphone: mute/unmute | Toggle, mute or unmute the microphone |
| Camera: start/stop | Toggle or set the camera on/off |
| Screen share: start/stop | Toggle or set screen sharing on/off |
| Recording: start/stop | Toggle or set recording on/off |
| Leave meeting | Leave the current meeting |
| Bring call to front | Focus the meeting window |
| Trigger custom action | Run a MuteDeck custom action by name (raise hand, reactions, …) |
Variables
All variables update live from MuteDeck:
| Variable | Values |
|---|---|
mutedeck_connected | True / False |
mutedeck_in_call | True / False |
mutedeck_muted | True / False |
mutedeck_video_active | True / False — camera on |
mutedeck_share_active | True / False — screen share running |
mutedeck_record_active | True / False — recording running |
mutedeck_mute_status | active (muted), inactive (unmuted), disabled (no mic) |
mutedeck_video_status | active, inactive, disabled |
mutedeck_share_status | active, inactive, disabled |
mutedeck_record_status | active, inactive, disabled |
mutedeck_call_status | active (in call), inactive, disabled |
mutedeck_control_status | active, inactive, disabled |
mutedeck_mute_label | Muted / Unmuted / No mic |
mutedeck_video_label | On / Off / Disabled |
mutedeck_share_label | On / Off / Disabled |
mutedeck_record_label | On / Off / Disabled |
mutedeck_call_label | In call / No call / Disabled |
The boolean _active/_muted variables drive button state bindings (Macro Deck requires True/False there). The _status variables carry MuteDeck's raw three-state values for conditional actions. The _label variables are for showing friendly text on buttons, e.g. a label template of {mutedeck_mute_label}.
Use these with Macro Deck's conditional actions or button state bindings to show mute/camera state on your deck.
Icons
On first run the plugin installs a MuteDeck Icons pack (muted/unmuted, camera, share, recording, leave meeting, reactions, including disabled states). When you add a toggle action to a button, Macro Deck offers to bind the matching variable to the button state — accept, then pick an On icon (e.g. muted) and an Off icon (e.g. unmuted) in the button editor and the button follows your live meeting status. The same icons are also available as a standalone icon pack (MuteDeck.MuteDeckIcons) in the Extension Store.
Setup guide
This walks you through building a mute button that shows your live mute state. The other controls work the same way.
Before you start, make sure the MuteDeck app is running and the plugin is installed and enabled in Macro Deck. The plugin adds a "MuteDeck Icons" pack the first time the Macro Deck window opens after installation.
Create a mute button
-
In the Macro Deck window, double click an empty button on the deck (or right click it and choose Edit). The Button Editor opens.
-
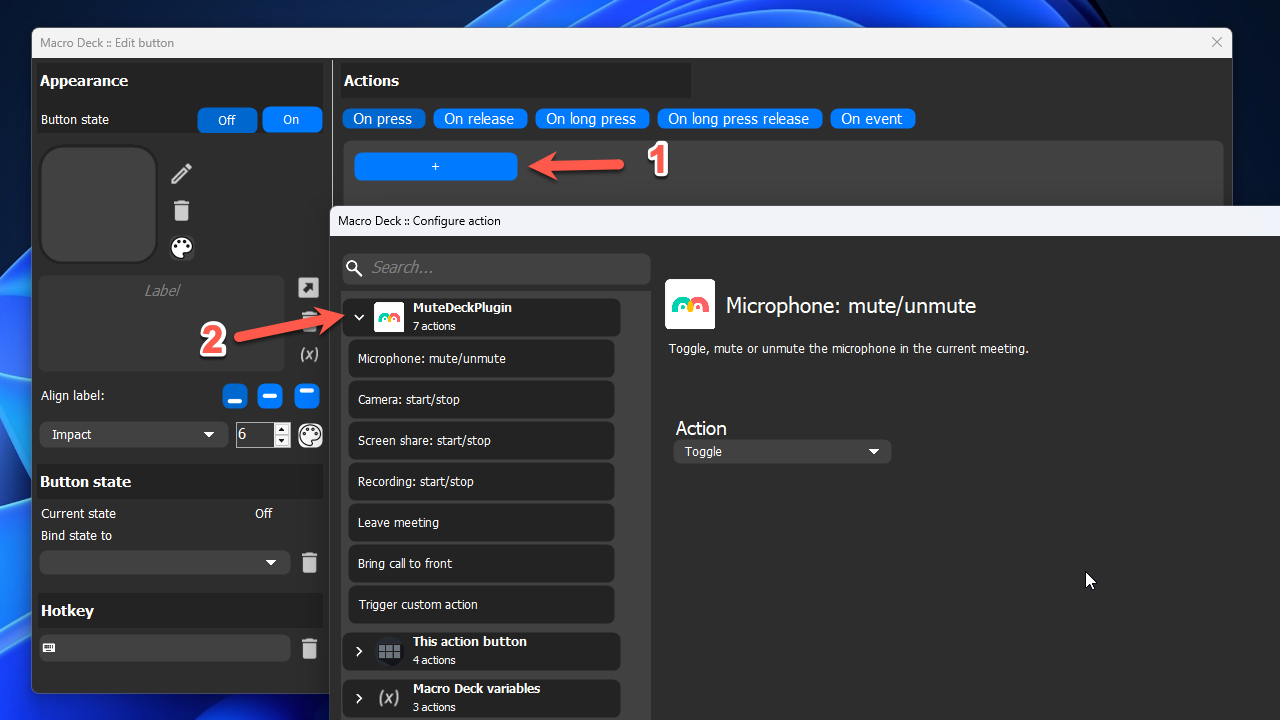
Under "On press", click the + to add an action. Find MuteDeckPlugin in the list, then pick "Microphone: mute/unmute". Leave the action on "Toggle" and confirm.
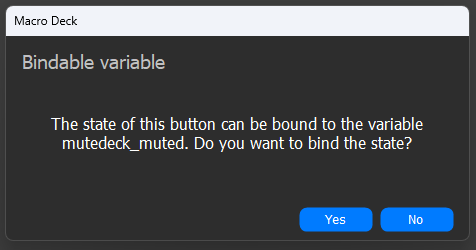
- Macro Deck now asks if it should bind the variable
mutedeck_mutedto the button state. Click yes. This is what makes the button follow your actual mute state instead of just blindly toggling.
-
Back in the Button Editor you'll see two buttons, On and Off. These are the two states of the button, and each state has its own icon, label and color. Because of the binding, the button is in the On state while
mutedeck_mutedis True, so while you are muted. -
Select the On state, click the button preview to open the icon selector, choose the MuteDeck Icons pack and pick the
mutedicon. -
Select the Off state and pick the
unmutedicon the same way.
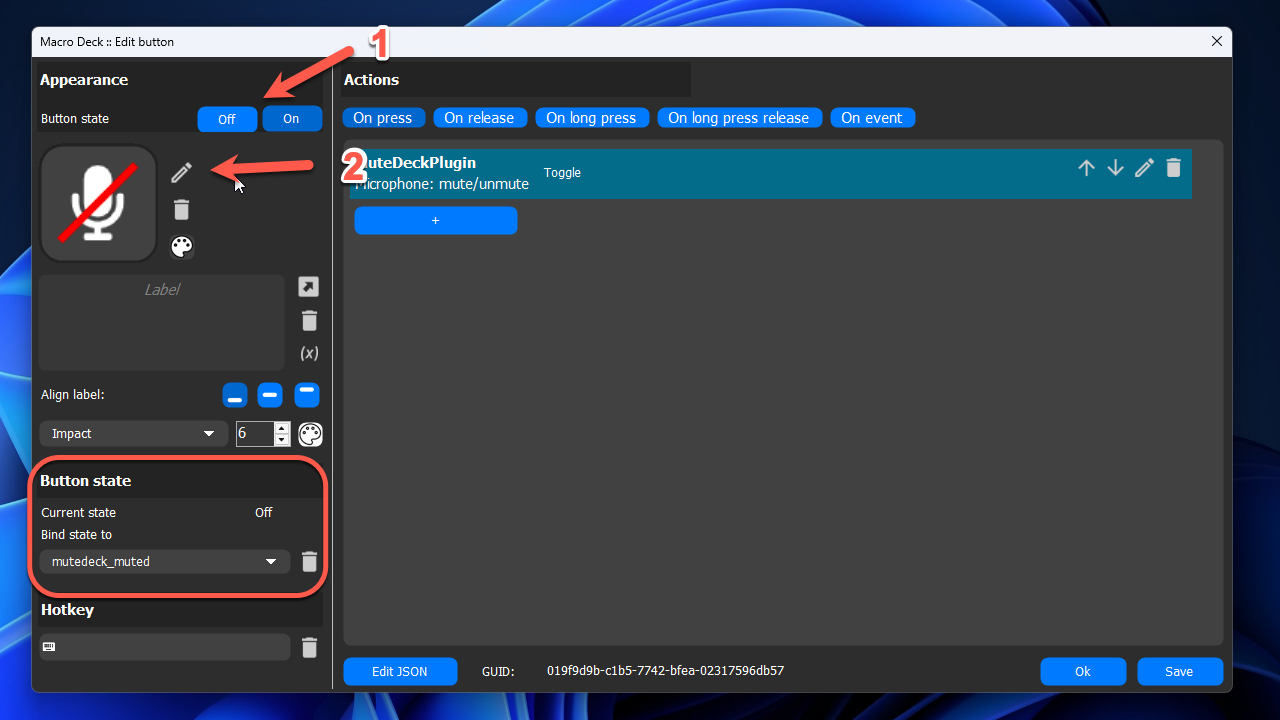
- Save. The button on your deck now flips between the two icons as you mute and unmute in your meeting.
Create a camera button
The other controls
Same steps, different action, variable and icons:
| Action | Bound variable | On state icon | Off state icon |
|---|---|---|---|
| Microphone: mute/unmute | mutedeck_muted | muted | unmuted |
| Camera: start/stop | mutedeck_video_active | video-started | video-stopped |
| Screen share: start/stop | mutedeck_share_active | sharing-started | sharing-stopped |
| Recording: start/stop | mutedeck_record_active | recording-started | recording-stopped |
| Leave meeting | mutedeck_in_call | leave-meeting | leave-meeting-disabled |
Note that the On state means the variable is True, not that the control is "on" in a positive sense. For the mute button, On means muted.
For "Leave meeting" the binding is optional, but with it the button only lights up while you are actually in a call.
Here's how a finished deck looks with all the controls on it, showing live status from MuteDeck and a Google Meet call:
Labels
Each state can have its own label text, so you can simply type "Muted" on the On state and "Live" on the Off state of a mute button.
You can also put a variable in a label and let the plugin do the wording. Type {mutedeck_mute_label} in the label field and it renders as Muted, Unmuted or No mic depending on the current state. The same works for {mutedeck_video_label}, {mutedeck_share_label}, {mutedeck_record_label} and {mutedeck_call_label}.
If you skipped the binding popup
You can set the binding by hand: open the Button Editor and pick the variable in the "State binding" dropdown.
Custom actions
Add the "Trigger custom action" action to a button and pick one of the actions discovered from MuteDeck, or type a name yourself, for example raise-hand or react-clap. The icon pack has matching icons for the common ones. Which custom actions do something depends on the meeting app you are in.
Configuration
By default the plugin connects to MuteDeck on localhost:3492. Open the plugin configuration in Macro Deck (Settings → Plugins → MuteDeck → Configure) to change the host or port — for example when MuteDeck runs on another computer and has "Allow network connections" enabled.