# My Microphone Is Not Working A Practical Troubleshooting Guide
Before you tear through software settings, start with the basics. A microphone problem is often something simple and physical. Think of it as the "is it plugged in?" check, but for your current setup. These quick steps solve most mic issues and can save you a lot of frustration.
# Start With Simple Hardware Checks
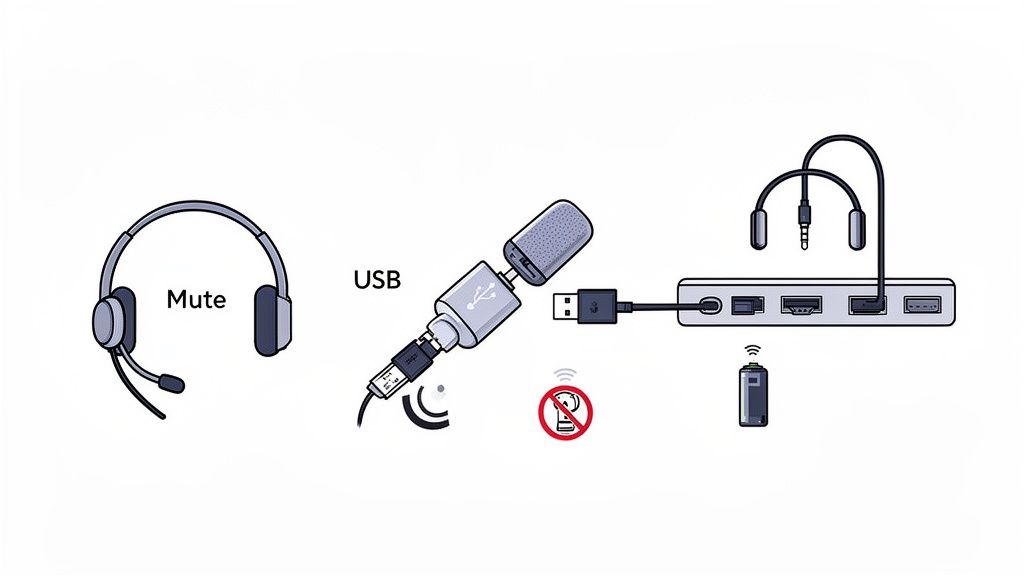
First, look for a physical mute switch. Many headsets and standalone mics have one on the cable or the body of the device. It’s easy to bump it by accident. A quick glance to make sure it isn't active is the fastest possible fix.
# Cable and Port Connections
Next, check the physical connection.
- USB Mics: Unplug it and plug it back in. Make sure it's seated firmly. Try a different USB port—sometimes a single port can get flaky or have driver issues. A dead port makes a good mic look broken.
- 3.5mm Jacks: Double-check that you’ve plugged it into the microphone input, not the headphone output. This is a common mix-up. The mic port is usually marked with a pink ring or a microphone icon.
- Wireless Mics: For wireless gear, check the battery level and make sure the USB dongle is connected securely to your computer.
This flowchart gives you a simple path for checking your hardware before you dive deeper into software.
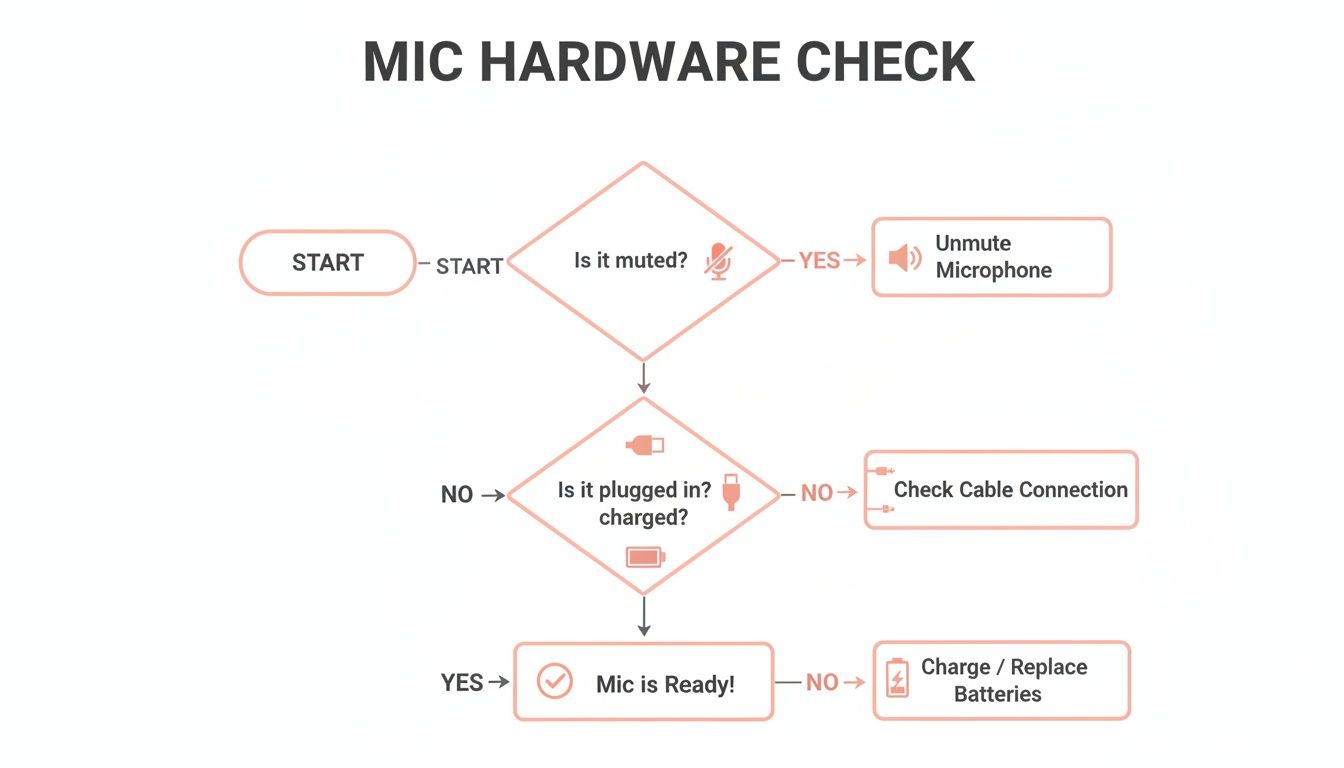
Starting with mute, cable, and power checks is always the most efficient path.
I once spent 20 minutes digging through audio drivers only to find my cat had knocked the USB cable just slightly out of its port. Always check the physical connections first.
Sometimes, the problem isn't a loose cable but a dirty one. Dust buildup in your computer's ports can cause strange hardware failures. A quick guide on cleaning your computer from dust (opens new window) can help prevent this. A clean port ensures a solid, reliable connection.
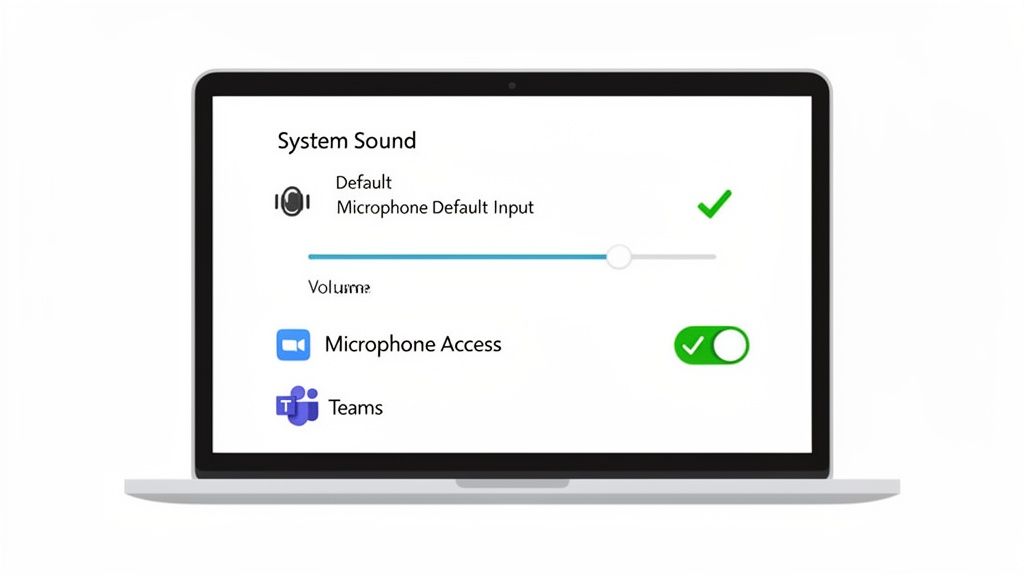
If all your cables are plugged in and your hardware seems fine, the problem is likely in your computer’s software settings. This is where your operating system manages audio inputs, and one misplaced setting can silence a perfectly good microphone.
# Select Your Default Mic
Your first stop should be the main sound control panel. Your computer needs to know which device it should be listening to, especially if you have multiple options like a webcam mic, a built-in laptop mic, and the headset you want to use.
Don't assume that plugging in a microphone makes it the default. Laptops with built-in mics and webcams often hold on as the primary input until you tell them otherwise.
# Finding Your Mic on Windows
On a Windows PC, right-click the speaker icon in your taskbar and hit "Sound settings." In the "Input" section, you'll find a dropdown menu. Make sure your preferred microphone is selected there.
Once it's selected, talk into your mic. You should see the "Test your microphone" bar light up. If it’s not moving, we’ll look elsewhere. But if it moves and seems low, click "Device properties" and check the volume slider. It might have just been turned all the way down. For more detailed tips, you can learn how to increase microphone volume on your PC (opens new window).
# Setting the Input on macOS
For Mac users, the controls are in a similar spot. Open System Settings, then click "Sound." Go to the "Input" tab, where you'll see a list of all available microphones.
Just like on Windows, select the device you want to use. The "Input level" meter shows you if the Mac is picking up any sound. If you see activity, your Mac recognizes the mic. If the "Input volume" slider is all the way to the left, that's your problem. Your mic is muted at the system level.
# OS Audio Settings Checklist
Here’s a quick-glance table to help you find the most important settings on both operating systems.
| Setting to Check | Windows Location | macOS Location | What to Look For |
|---|---|---|---|
| Default Input Device | Settings > System > Sound > Input | System Settings > Sound > Input | Is your desired microphone selected from the list? |
| Input Volume/Level | Sound > Input > Device properties | System Settings > Sound > Input | Is the volume slider turned up and not at zero? |
| App Permissions | Settings > Privacy & security > Microphone | System Settings > Privacy & Security > Microphone | Is the app you're using (e.g., Zoom) allowed to use the mic? |
Running through these three checks will solve most system-level microphone issues.
# The Overlooked Privacy Switch
This is a big one that trips people up. Modern operating systems are built with privacy in mind, meaning you have to grant applications permission to access your microphone. If you've done everything above and your mic still isn't working in Zoom or Teams, this is almost certainly why.
- On Windows: Go to Settings > Privacy & security > Microphone. Make sure both "Microphone access" and "Let apps access your microphone" are toggled on. Then, scroll down and find the specific app you’re using to ensure its own switch is on, too.
- On macOS: Open System Settings > Privacy & Security > Microphone. You'll see a list of all apps that have requested access. If the toggle next to your meeting app is off, flip it on. You'll probably need to restart the app for the change to take effect.
This permissions check has become a standard troubleshooting step. One recent study found that 43% of users weren't even aware that individual apps needed mic permissions. Checking this one setting can be the instant fix you're looking for.
# Solving Application-Specific Mic Issues
Ever had that moment? You test your mic in your computer’s settings, see the volume bar jump, and think you're good to go. Then you hop into a Zoom call and… silence.
It’s a classic sign of an application-specific issue. The problem isn't with your mic or your computer; it's inside the software you're trying to use. When your mic is working at the system level but goes dead in an app like Microsoft Teams, Google Meet, or Zoom, the first place to look is that app's own audio settings.
These programs often have their own input device selection, separate from your system's default. If you have multiple audio sources plugged in—like a webcam mic, a headset, and your laptop's built-in mic—the app might be listening to the wrong one.
# Dive Into the In-App Audio Settings
Your next step is to get into the audio or A/V settings for the application you’re using. Hunt for a dropdown menu labeled "Microphone" or "Audio Input."
Here’s where to find it in common apps:
- Zoom: Go to Settings > Audio. You'll see a microphone dropdown. Click it and make sure the correct device is selected.
- Microsoft Teams: Click your profile picture, then go to Settings > Devices. Find the "Audio devices" section and choose your microphone.
- Google Meet: Click the three dots, navigate to Settings > Audio, and pick your mic from the list.
Most of these apps have a "Test Mic" button next to the dropdown menu. Use it. Speak into your microphone and watch for the visual meter to light up. That’s your confirmation that the app can now hear you.
If you’ve cycled through all the options and still get nothing, you might need to dig deeper. We have a guide for when an app is not detecting your microphone (opens new window) that can help.
# When One App Hijacks Your Mic
Another common headache is when one application "captures" your microphone and refuses to let other programs use it. This often happens if you have an app running in the background that you forgot about.
The fix is usually simple: close all applications that might be using your mic, then reopen only the one you need.
If your microphone is not working in one specific app, 90% of the time it's because that app is configured to listen to the wrong input device. Always check the application’s audio settings before assuming the hardware is broken.
This constant juggling of settings is why many people use a tool like MuteDeck. It syncs your mute status across all your meeting apps, giving you a single control. No more hunting for the right button in each program or having an embarrassing "hot mic" moment when you thought you were muted.
# Advanced Driver and Software Fixes
So, you've checked all the cables and confirmed your system settings look good, but the mic is still dead. Now we start digging deeper. Often, the problem isn't the hardware but the software that tells your computer how to use it—the drivers. A corrupted or outdated driver can make a good microphone invisible to your PC.
# Diving into Windows Device Manager
For Windows users, the first stop is the Device Manager. It's the complete roster of every piece of hardware connected to your computer. The easiest way to get there is to right-click the Start button and select "Device Manager."
Once it’s open, look for "Audio inputs and outputs" and expand it. You should see your microphone listed. If there's a small yellow triangle with an exclamation mark next to it, that’s a sign of a driver issue.
# Updating and Reinstalling Drivers
First, try a simple update. Right-click on your microphone in the list and choose "Update driver." Let Windows search automatically.
If that doesn't work, a clean reinstall is often the most effective fix.
- Right-click the microphone again and select "Uninstall device."
- If you see a checkbox to delete the driver software, tick it.
- Unplug your microphone, then restart your computer. A full restart, not just sleep/wake.
- Once you're back up, plug the mic back in.
This forces Windows to treat the microphone like a new device, finding and installing a fresh driver from scratch.
A full driver reinstall might seem dramatic, but it’s a reliable way to solve stubborn software conflicts. It clears out junk files and gives the mic a clean slate, fixing a surprising number of audio problems.
# Resetting Core Audio on a Mac
Mac users have a different setup since macOS handles most drivers behind the scenes. You won't find a Device Manager, but you can still run into software glitches that silence your mic. My go-to fix is to reset the Core Audio service.
It sounds technical, but it’s simple. You can do it from the Terminal.
- Open Terminal (you can find it in your Utilities folder or search for it with Spotlight).
- Carefully type this command and hit Enter:
sudo killall coreaudiod - It will ask for your administrator password. Type it in and press Enter.
This command instantly restarts the background process that manages all sound on your Mac. It’s a powerful fix for audio bugs and is much faster than rebooting your entire system.
# The Ultimate Litmus Test
Before you declare the hardware broken, there’s one last test I always recommend. Use your computer’s built-in recording app.
On Windows, search for the Voice Recorder app. On a Mac, it’s Voice Memos.
Open the app and hit record. If your microphone works here, the hardware is fine. This tells you the problem is isolated to a specific application’s settings or permissions. You've just narrowed your search down.
# Why Your Microphone Fails: A Look at the Hardware
When your mic suddenly stops working, it’s natural to blame the software. But sometimes, the problem is physical: the hardware itself has given up. The tiny microphones in modern laptops, webcams, and headsets are marvels of engineering, but they’re also fragile.
Most of these are MEMS (Micro-Electro-Mechanical Systems) microphones. They’re built on a microscopic scale, which makes them vulnerable to physical damage. A short drop, some dust in the grille, or even high humidity can be enough to cause a permanent failure.
Knowing how to respond to common hardware issues like liquid damage (opens new window) (and which popular "fixes" to avoid) can save you a lot of grief.
# The Problem with Microphone Arrays
Many high-end devices today feature microphone arrays—multiple mics working together to isolate your voice and cut out background noise. This tech is great when it works, but it also introduces more points of failure. If just one microphone in that array goes down, the whole system can suffer.
Suddenly, your audio might sound tinny, distant, or robotic. It’s not always a software glitch; it could be that one of those tiny physical components has failed.
# Wireless Mics and Their Unique Headaches
Going wireless gets rid of cables, but it brings a new set of hardware problems. The wireless microphone market was valued at USD 2.37 billion in 2023, but these devices have their own vulnerabilities.
Battery degradation is a huge one. As batteries age, they can lead to weak signals, audio distortion, or the mic just dying mid-sentence. One manufacturer privately admitted they expected 90% of their advanced ten-mic arrays to fail in the field within six months, largely due to their fragile nature.
The freedom of wireless is always balanced against the risk of signal dropouts and battery failure.
I’ve seen wireless setups fail spectacularly during important presentations. The most common cause? The user forgot to charge the device overnight. Battery health is a critical piece of the hardware puzzle.
Understanding these limitations helps you handle your equipment with more care. If you're looking for gear that balances features with reliability, check out our guide on the best microphones you can buy in 2024 (opens new window). Knowing why hardware fails is the first step toward preventing it.
# Common Microphone Head-Scratchers
Even when you've done everything right, some microphone issues can leave you stumped. Here are a few common scenarios and what’s usually going on.
# Why Does My Mic Work In One App But Not Another?
This is almost always an app-level problem, and it comes down to one of two things: the app is grabbing the wrong mic, or it doesn't have permission to use the right one.
First, dive into the audio settings of the app that's giving you trouble. Apps like Zoom (opens new window) or Microsoft Teams (opens new window) commonly default to a built-in webcam mic instead of the new headset you just plugged in. Make sure your preferred microphone is explicitly selected as the input device there.
If that's set correctly, double-check your system's privacy permissions. You might have clicked "Allow" for one app ages ago but accidentally denied access to another. Both Windows and macOS keep a list of which apps have received microphone access. A quick look there usually solves the mystery.
# My Voice Is Suddenly Way Too Quiet. What Happened?
If colleagues suddenly say you sound like you're talking from the other side of the room, there are two quick things to check.
First, check your physical distance from the mic. Have you leaned back in your chair or bumped the mic boom? This is especially important for dynamic microphones like the ATR2100x (opens new window), which are designed to pick up sound from very close.
If your positioning is fine, look at the input volume slider in your computer's sound settings. A software update or another application can quietly turn it down. Slide that level back up to around 75-80% and see if that fixes it.
# Could My USB Hub Be Causing Problems?
Yes, absolutely. USB hubs are a classic culprit for all sorts of weird audio behavior.
High-quality USB mics need a steady stream of power to work correctly. When you plug one into a hub—especially an unpowered one—it has to fight for power with every other connected device.
If your mic is cutting out, sounding robotic, or just not showing up at all, try this: plug it directly into a USB port on your computer's motherboard. If the problem vanishes, you've found your culprit. The hub wasn't delivering enough consistent power.
# How Do I Know When It’s Time for a New Microphone?
If you’ve plugged the mic directly into a couple of different computers and it fails on all of them, the hardware has likely failed.
Other tell-tale signs of a dying mic include a persistent static or crackling sound that doesn't go away when you swap out the cable, or any obvious physical damage. Once a microphone starts to fail electronically, it's rarely worth the headache of trying to repair it.
Tired of fighting with microphone settings in every single meeting app? MuteDeck gives you one universal, reliable set of controls for Zoom, Teams, Google Meet, and more, so you're always in command of your audio. Manage your calls with confidence at https://mutedeck.com (opens new window).