# Camera on Macbook Pro not working? Here's a quick fix guide
It's the moment we all dread: you jump on a video call, and instead of your face, your team sees a black screen. The "No camera available" message pops up, and the frustration is real.
But before you start thinking about a trip to the Apple Store, take a deep breath. Most of the time, this isn't a hardware failure. It's usually a simple software hiccup that you can fix in a few minutes.
# Your First Line of Defense for a Non-Working MacBook Camera
These first few checks are your fastest path to getting back on video. They tackle the most common reasons a perfectly good camera suddenly decides to play dead.
# Is the App Even Allowed to Use the Camera?
One of the most frequent culprits is also the simplest: the app you're using just doesn't have permission to access your camera. This is a core privacy feature in macOS, and it's easy to accidentally click "Don't Allow" when you're setting things up in a hurry.
A classic sign of this is when your camera works perfectly fine in Photo Booth but refuses to show up in Microsoft Teams or Zoom. That’s not a broken camera; it’s a permissions issue. You just need to tell macOS it's okay for that specific app to use it.
To do this, head over to System Settings > Privacy & Security > Camera.
Make sure the toggle next to the app you're trying to use is switched on.
Practical Tip: Is the permission already on? Try toggling it off and on again. This little trick forces macOS to re-register the setting and can often shake loose a stubborn software glitch. For this to work, you must fully quit the app (use Command + Q) and then relaunch it after changing the permission.
# Hunt Down Conflicting Apps
Your MacBook’s camera can only be used by one application at a time. Sometimes, an app doesn't properly let go of the camera after you're done. Ever finish a Google Meet call and then try to open FaceTime, only to be told the camera is in use? That's what's happening.
Often, the troublemaker is a process running silently in the background. Your best friend for this task is Activity Monitor.
- Open Activity Monitor (you can find it in your Applications > Utilities folder).
- In the search bar at the top-right, type
VDCAssistant. This is the macOS process that directly controls the camera. - If you see it in the list, click on it to select it, then hit the "X" button at the top to quit the process.
This forces the camera to reset without needing to reboot your entire Mac. Once your camera is back online, you might find our quick start guide (opens new window) handy for getting your meeting controls streamlined.
# The All-Powerful Reboot
When all else fails, never underestimate the magic of a simple restart.
Rebooting your MacBook Pro clears out temporary caches, closes every single background process, and gives the whole system a fresh start. It’s the universal fix for countless weird tech issues, and a non-working camera is definitely one of them. This single step can resolve hidden software conflicts in less than a minute.
Practical Tip: To ensure a clean reboot, close all your applications manually before you select "Restart..." from the Apple menu. This helps prevent any stuck processes from interfering with a clean shutdown and startup cycle.
Before diving into the more technical resets, running through these initial checks can often solve the problem in just a few minutes. Here's a quick summary to keep handy.
# Quick Fix Checklist for MacBook Pro Camera Issues
| Troubleshooting Step | What It Does | When to Use It |
|---|---|---|
| Check App Permissions | Ensures apps like Zoom or Teams have explicit permission to access your camera hardware. | When your camera works in some apps (like Photo Booth) but not others. |
| Quit Conflicting Apps | Uses Activity Monitor to shut down background processes that might be "hogging" the camera. | When you get a "camera in use" error even after closing all video apps. |
| Restart Your MacBook | Clears temporary system files and resets all software and hardware connections. | When the issue seems random or you can't pinpoint a specific cause. |
These three steps are the foundation of good Mac troubleshooting. They're quick, easy, and resolve the vast majority of camera issues without needing any deep technical dives.
When the quick fixes don’t do the trick, the problem often runs a little deeper. We’re talking about stubborn conflicts within macOS itself or between clashing applications. These can feel intimidating, but the solutions are usually straightforward system resets that won't touch your personal data. This is the next logical step when your camera on a MacBook Pro is not working and you've already checked the basics.
First off, always make sure your macOS is up to date. Apple is constantly pushing out software updates with bug fixes and driver improvements that can directly impact hardware like the built-in camera. It's not uncommon for a pending update to hold the exact patch you need. You can check by heading to System Settings > General > Software Update.
# Force a Camera Controller Reset
If your software is current, it's time for a more direct approach. Sometimes, the background process that manages your camera—known as VDCAssistant—simply gets stuck. Have you ever closed every app, but that little green camera light stays defiantly on? That’s a classic sign the controller process hasn’t shut down properly.
You can give it a nudge by force-quitting the process through the Terminal app. Think of it as a "soft reset" specifically for your camera.
- Open the Terminal app (you'll find it in Applications > Utilities).
- Carefully type or paste this command and hit Enter:
sudo killall VDCAssistant - It will ask for your Mac's administrator password. Type it in and press Enter. Don't worry if you don't see characters appear as you type—that's a security feature.
This command instantly shuts down the camera controller. The next time an app tries to use the camera, macOS will restart the process from a clean slate, which often clears the glitch. It's much faster than a full reboot and targets the exact source of the trouble.
# Isolate the Problem with a New User Account
If the camera is still on strike, the problem might be tangled up in a corrupted setting or preference file specific to your user profile. A great way to test this theory is to create a temporary new user account on your Mac.
If the camera works perfectly in the new account, you’ve just confirmed the problem is isolated to your main profile and isn't a system-wide hardware or software failure.
This is one of the most useful diagnostic tricks out there. A working camera in a test account tells you to stop worrying about system-wide resets and start focusing on your own account's settings.
Creating a test account is quick:
- Navigate to System Settings > Users & Groups.
- Click Add Account (you'll likely need to enter your password).
- Set up a new Standard user, then log in to test the camera with an app like FaceTime or Photo Booth.
If the camera works in the test account, the issue is almost certainly a configuration conflict on your primary profile. When that happens, you may need to dig deeper into why a specific app is not detecting your camera, as this often points back to user-specific settings.
# Using Advanced Resets for Persistent Camera Issues
So the usual software tweaks didn't work. Before you start bracing for a repair bill, there are a couple of deeper, more powerful resets you can try. These aren't your standard reboots—they target the low-level firmware that manages your Mac's physical hardware.
I've seen these resets fix some of the most baffling camera problems, especially those where macOS acts like the camera doesn't even exist.
A lot of users run into this exact wall: the camera indicator light stays off, and the system fails to recognize the hardware entirely. It’s a classic symptom of a communication breakdown between the hardware and the software, and as this in-depth iFixit community report (opens new window) shows, you're not alone.
The good news? These advanced resets sound technical, but they're safe, designed by Apple, and won't touch your personal files.
# Reset the System Management Controller (SMC)
Think of the System Management Controller (SMC) as the behind-the-scenes manager for your Mac’s physical parts. It handles everything from cooling fans and battery charging to—you guessed it—the internal camera.
When the camera on your MacBook Pro is not working and isn't even showing up in the system, an SMC reset can be the kick it needs to re-establish its connection with macOS.
How you do it depends on which MacBook Pro you have.
For Intel-Based MacBook Pro Models (with a T2 Security Chip) These are generally the models from 2018 or newer.
- Shut down your MacBook Pro completely.
- Press and hold the power button for 10 seconds, then let go.
- Wait a few seconds, then press the power button again to turn it on.
For Older Intel-Based MacBook Pro Models (without a T2 Chip) These are typically pre-2018 models.
- Shut your Mac down.
- On the built-in keyboard, press and hold these three keys for 7 seconds: Control + Option (Alt) + Shift.
- Keep holding them and now press and hold the power button too.
- Hold all four keys down for another 7 seconds, then release them all at once.
- Wait a moment, then press the power button to start your Mac.
Practical Example: An SMC reset is my go-to for weird hardware glitches. It’s especially good when the camera isn't detected at all, since it directly resets the component’s power and communication pathways. For instance, if your Mac doesn't react at all when you open FaceTime (no green light, no error message), the SMC is the first thing to reset.
# Clearing the NVRAM or PRAM
Next up is the NVRAM (non-volatile random-access memory), or PRAM on really old Macs. This is a tiny bit of memory that stores system settings for quick access—things like screen resolution, sound volume, and which disk to boot from.
While it's less directly linked to the camera than the SMC, corrupted settings here can cause all sorts of strange hardware behavior. A reset clears out the old settings and forces your Mac to re-scan its hardware from a clean slate.
How to Reset the NVRAM on Intel-Based Macs
- Shut down your MacBook Pro.
- Turn it on and immediately press and hold these four keys: Option + Command + P + R.
- Keep holding them for about 20 seconds. You might hear a second startup chime or see the screen flash.
- Let go of the keys and allow your Mac to boot up normally.
A quick note for Apple Silicon Macs (M1, M2, M3): you can't do this manually. The system architecture is different, and it handles these checks automatically every time you start up. For you, a simple shutdown and restart is the equivalent procedure.
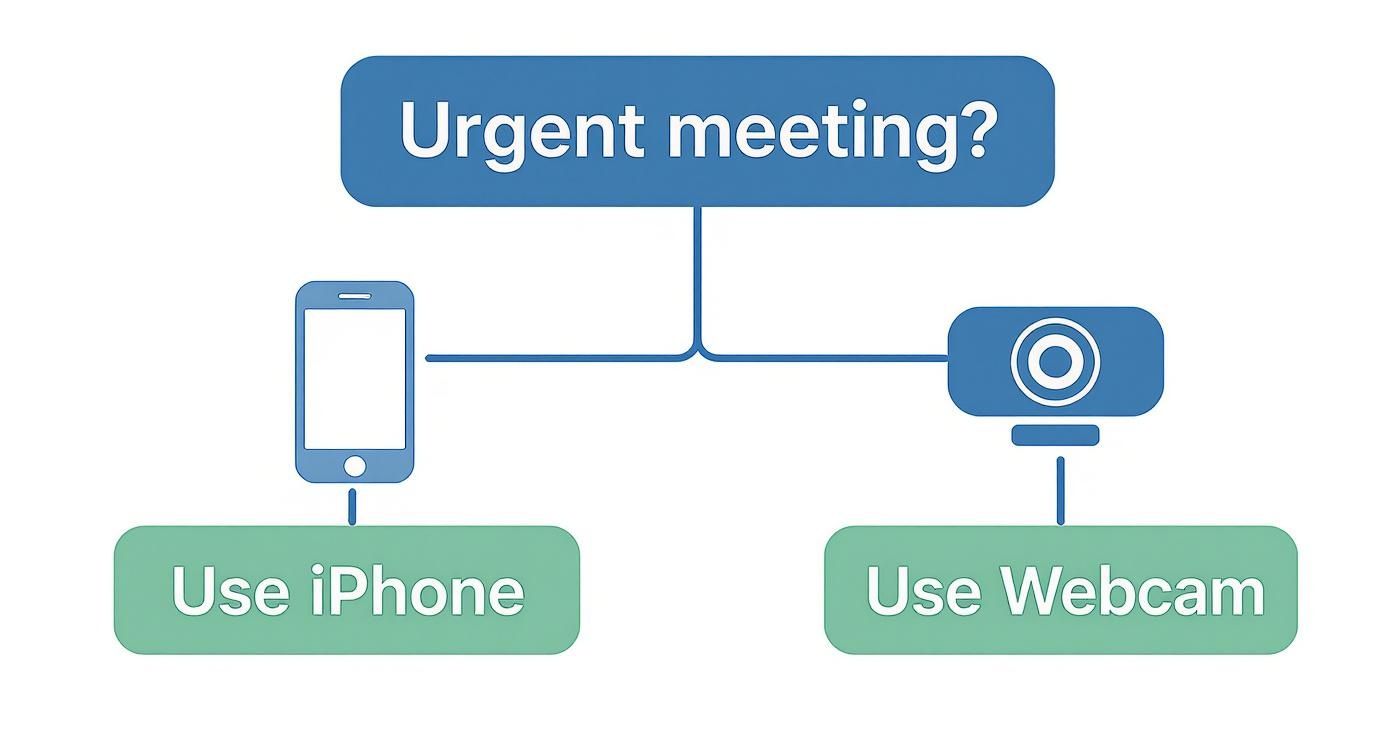
# Practical Workarounds When You Need a Camera Now
Let’s be real. Your MacBook camera will inevitably fail five minutes before a critical meeting. Deep troubleshooting isn't an option when you’re on the clock. You need a fix, and you need it now.
The good news is you have some fantastic, quick-and-dirty options that can save the day. In fact, they might even make you look better on camera than you would have otherwise.
# Grab an External USB Webcam
The simplest, most direct solution is to plug in an external USB webcam. This completely sidesteps whatever software or hardware conflict is plaguing your Mac’s built-in camera.
Most modern webcams are plug-and-play with macOS. A workhorse like the Logitech C920 just works—you plug it in, and apps like Zoom or FaceTime immediately see it. Just head to your video settings and switch the source. Done.
This is more than a stopgap. An external camera often delivers a massive upgrade in image quality, with better resolution and low-light performance. Honestly, keeping a decent external webcam in your desk drawer is just a smart move for anyone who relies on video calls.
# Use Your iPhone as a High-Quality Webcam
What if you don't have an external webcam handy? You probably have something even better in your pocket. Apple’s Continuity Camera feature is a game-changer, letting you use your iPhone’s ridiculously good camera system as a webcam for your Mac—wirelessly.
It’s built right into the ecosystem. All you need is:
- An iPhone running iOS 16 or later.
- A Mac running macOS Ventura or later.
- Both devices signed into the same Apple ID, with Wi-Fi and Bluetooth on.
That’s it. Just bring your unlocked iPhone near your Mac while a video app like FaceTime is open. Your Mac should automatically detect it and switch over.
Practical Tip: Don't think of this as just a temporary fix. Continuity Camera is an instant pro upgrade. You get access to features like Center Stage, which keeps you perfectly framed, and Portrait Mode for that nice, blurry background. A frustrating camera problem just became an opportunity to look way more professional. For a stable setup, invest in a simple stand or a clip that holds your iPhone securely on top of your MacBook screen.
# How to Know if It's a Hardware Failure
So, you’ve tried every software trick in the book, and your camera still isn't working. It's frustrating, I know. At this point, it’s time to stop chasing software ghosts and figure out if the problem is physical. Distinguishing between a stubborn software glitch and a genuine hardware failure is the key to saving your sanity (and your time).
The best way to do this is to bypass the apps and ask macOS directly: "Can you even see the camera?"
# Check the System Information Report
Your Mac keeps a detailed inventory of every single piece of hardware connected to it. If the built-in camera isn't on that list, it's a massive red flag. It means macOS itself can't find it, which usually points to a physical disconnection or failure.
Here’s how to pull up that report:
- Click the Apple menu in the top-left corner.
- Hold down the Option (⌥) key, and you'll see "About This Mac" magically change to "System Information..." Click it.
- In the new window, look for the "Hardware" section in the left sidebar and click on "Camera."
If everything is okay, you’ll see something like "FaceTime HD Camera" with a bunch of model and ID info. But if the screen says "No video capture devices were found," that’s your strongest clue yet that this is a hardware problem.
Think of it this way: a blank System Information report is the closest you can get to a hardware failure diagnosis without actually opening up your Mac. It tells you the connection between the camera and the logic board is likely broken.
# Run Apple Diagnostics to Confirm
Before you give up hope, there's one last tool in your arsenal: Apple Diagnostics. It’s a built-in utility that scans your Mac’s components for physical faults and will spit out an error code if it finds something wrong. It’s a reliable final check.
The process is a little different depending on your Mac's chip:
- For Apple Silicon Macs (M1/M2/M3): Shut down your Mac completely. Now, press and hold the power button until the startup options screen appears, then press Command (⌘) + D.
- For Intel-based Macs: Shut down your Mac. Turn it on and immediately press and hold the D key until the diagnostics tool loads.
Just follow the on-screen prompts. If the scan finishes and gives you a camera-related error code (like NDC001, for example), you’ve got your confirmation.
# Software Glitch vs. Hardware Failure
Still not sure what you're dealing with? This table breaks down the common symptoms to help you pinpoint the root cause.
| Symptom | Likely a Software Issue If... | Likely a Hardware Failure If... |
|---|---|---|
| Camera not detected | It works in some apps but not others (e.g., works in Photo Booth, not Zoom). | The camera is not listed in System Information at all. |
| Green indicator light | The light is on, but the video feed is black or frozen. | The light flashes intermittently or doesn't turn on at all. |
| System performance | The issue started right after a macOS update or new app installation. | The problem persists across Safe Mode, new user accounts, and even after a clean OS install. |
| Error messages | You see "Camera is in use by another application" or permission-related errors. | Apple Diagnostics returns a specific hardware error code (like NDC001). |
This isn't an exact science, but if your symptoms lean heavily into the "Hardware Failure" column, it's probably time to stop troubleshooting software.
Unfortunately, some models are just more prone to these issues. For example, forum discussions have shown that around 1.7% of certain 2019 MacBook Pro models experienced failures that ended up needing a logic board replacement—a repair that's often linked to camera functionality.
If all signs point to a hardware problem, your next step should be to contact professional MacBook repair services (opens new window) for a proper diagnosis and a quote. In the meantime, using an external webcam is a great workaround. If you need help with that, our guide on connecting devices to your setup (opens new window) can walk you through it.
# A Few Common MacBook Camera Scenarios
Even after running through the usual troubleshooting steps, you might be left with some head-scratching questions. Let's tackle a few of the most common camera quirks I see and what they usually mean.
# Why Does My Camera Work in Photo Booth but Not Zoom?
This one almost always comes down to permissions. macOS is pretty strict about privacy and makes you approve camera access for every single app. If your camera works in a built-in app like Photo Booth but not a third-party one like Zoom or Teams, it's a huge clue that the app just doesn't have permission to use it.
The fix is usually simple. Head over to System Settings > Privacy & Security > Camera. You should see a list of apps that have requested camera access. Just find the app that's giving you trouble and make sure the toggle next to it is switched on.
Practical Tip: Sometimes the system gets a little stuck. A quick fix is to toggle the permission off and then back on again. Always remember to completely quit and restart the app afterward for the changes to kick in. You can force-quit an app by right-clicking its icon in the Dock and selecting "Quit" or by pressing Command + Q.
# What Does the “No Video Capture Devices Found” Error Mean?
Okay, seeing this message can be a bit alarming. It means macOS can't find your camera hardware at all. While it could point to a hardware failure, don't jump to that conclusion just yet. I've seen this pop up from a deep-seated software glitch that a simple restart won't touch.
Before you panic, the first things to try are an SMC reset and an NVRAM reset (for those on Intel-based Macs). These low-level resets can often jolt the connection between your operating system and the camera hardware back to life, making the error message disappear.
# Is the Green Camera Light Always Telling the Truth?
For the most part, yes. That little green light is a hardware-level feature, meaning it's wired to be a reliable indicator that the camera is active. Apple designed it to be very difficult for software to trick.
However, software isn't perfect. On rare occasions, a bug might cause the light to get stuck in the 'on' position even after you've closed every app that uses the camera. If that happens, the quickest way to turn it off without a full reboot is to force-quit the VDCAssistant process. You can find it in the Activity Monitor or shut it down using the Terminal.
If you’ve tried everything and confirmed it's a genuine hardware failure, it might be time to explore options for a second-hand Apple laptop (opens new window) as a more budget-friendly replacement.
Tired of hunting for the mute button in the middle of a call? MuteDeck gives you one-touch, universal controls for your mic, camera, and screen sharing across Zoom, Teams, Google Meet, and more. Stop fumbling and stay focused on the conversation. Check out MuteDeck (opens new window).