
# Do Not Disturb Light with MuteDeck and Home Assistant
Has anyone ever walked in on you while in a virtual meeting? If so, you’ll love this integration with Home Assistant. This post will guide you through creating a sensor inside Home Assistant that connects to the MuteDeck API to determine whether you’re in a call. After creating the sensor, you can create automations that turn on a light (or do other things) when you start a meeting. Put this light outside your door, and you have an automatic Do Not Disturb light. 😃
Note: I’ve picked the do not disturb light use case for this automation example, as it’s a common ask. It’s also possible to use this integration to fire up Elgato Lights when joining a meeting to look your best or even close the window shades to get the best lighting. The possibilities are endless. 😉
# Home Assistant
If you’re unfamiliar with Home Assistant (HA), it’s open-source home automation software that runs on Raspberry Pi, Windows, macOS, storage (NAS) devices, and many more platforms. Easy installation and over 2100 out-of-the-box integrations, like Philips Hue, Alexa, Sonos, and more.
Home Assistant can make your home feel alive even if you only have smart lights.
# MuteDeck API
Our software doesn’t only detect meetings and your status in them; it can tell the world. Using its built-in API, any application can request whether or not you’re in a meeting and if you’re muted or unmuted.
This is where you can use software like Home Assistant to turn on your do not disturb light.
# Integration
In this example, we’ll be creating a custom sensor in Home Assistant to call MuteDecks’ API and create automation to turn on a Philips Hue light when you join a meeting and another automation to turn off the light when the meeting ends.
I’ll cover how to create a sensor and automation in this post. I’ll assume a pre-existing light that’s already in Home Assistant. Add your lights first. Here’s an example for Philips Hue (opens new window).
# Creating a Sensor
If you’ve never created a custom sensor in Home Assistant before, it’s done in YAML configuration files, which are editable on the device that’s running HA. I’m running it as a Virtual Machine, meaning I’d have to use SSH for file editing.
However, there’s an easier way by installing the Visual Studio Code Server (opens new window) add-on. This gives you Visual Studio Code right in the browser to edit files on your HA. Install the add-on via Settings → Add-ons → Add-on Store (bottom right) → Search for ‘code’ and install the add-on. Also, turn on the option “Show in sidebar” to find it easily.
Once you have a way to edit the HA configuration files, create a file called “sensor.yaml” in the directory and paste the text in this YAML file below. Add our YAML code to your existing file if you already have custom sensors.
https://github.com/mutedeck/integrations/blob/main/home-assistant/sensor.yaml (opens new window)
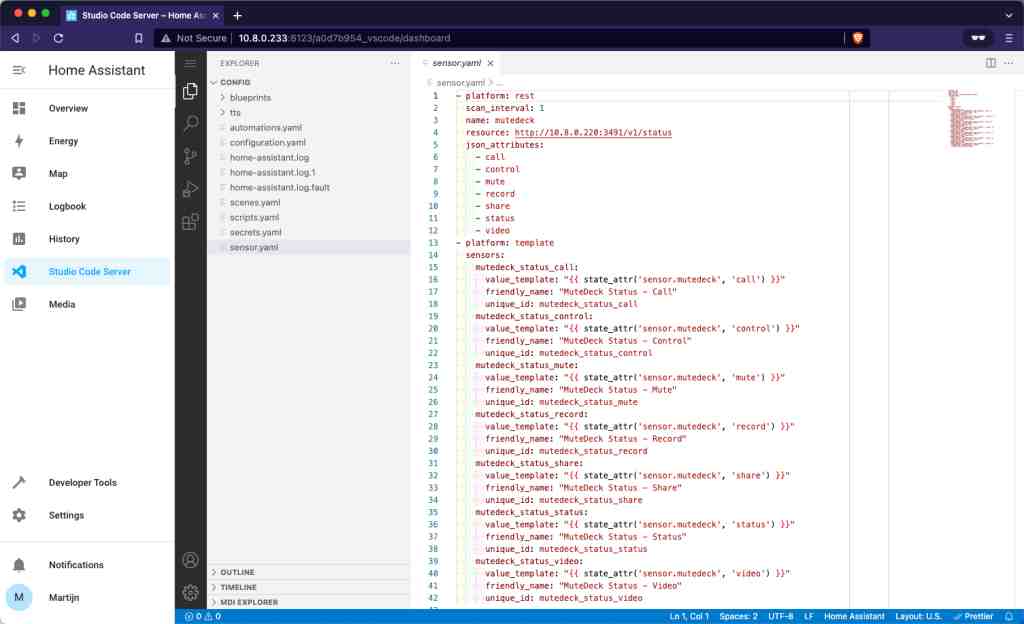
NOTE: Change the http://CHANGE-THIS-TO-YOUR-COMPUTERS-IP:3491/v1/status to substitute “CHANGE-THIS-TO-YOUR-COMPUTERS-IP” with the IP address of the computer where you are running MuteDeck on. In the screenshot above, my IP address is 10.8.0.220.
If you haven’t created a custom sensor before, you also need to edit the “configuration.yaml” file and include this at the bottom:
sensor: !include sensor.yaml
Now restart HA to enable the sensor.
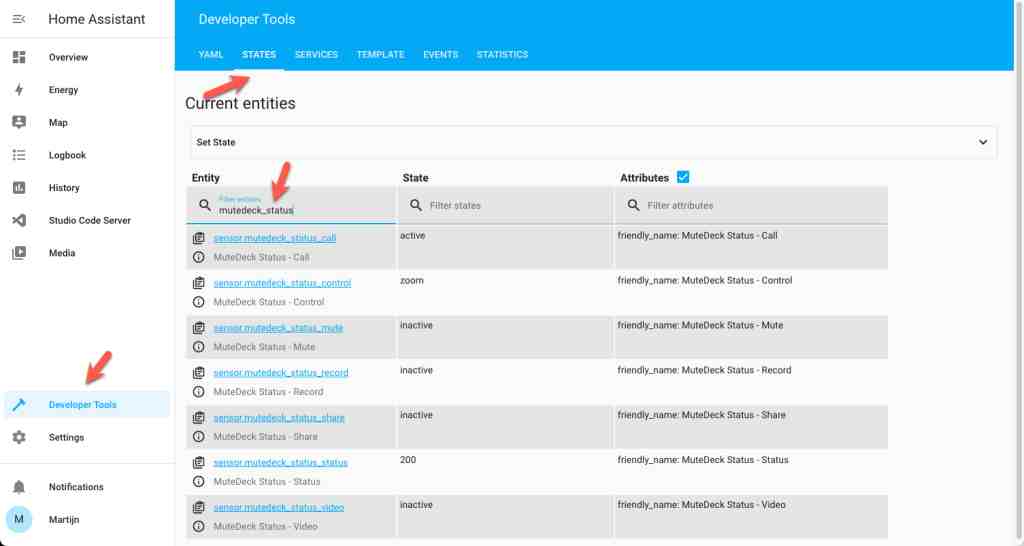
# States
Once the sensor is running, the call status is available as a state in HA. Call, mute, video, share, and record status are all available. It even includes the type of call. You can check the state values using the Developer Tools before moving on and creating an automation.
Here’s an example of the states when I’m in a Zoom call:
# Creating Automations
Now that Home Assistant knows about your calls, you can create automations to respond to state changes, like when you’re joining a call. Head to Settings → Automations → Create Automation and follow these steps:
- Start with an empty automation
- Give the automation a recognizable name, i.e., MuteDeck - Light on when call starts
- Change the Trigger type to State
- Select MuteDeck Status - Call as the Entity
- Enter active in the Entity To field
- Select Device as the Action Type
- Search and select the light that you want to use as the do not disturb light
- Select Turn on as the Action
- Hit the Save button
- Here’s a visual walkthrough, if you prefer: https://youtu.be/4kv--KEKBr4 (opens new window)
You now have working automation that turns on a light when you join a meeting! But, it also needs to turn off when you exit a meeting. To accomplish that, create another automation using the same options as before, with two changes:
- Enter unknown in the Entity To field
- Select Turn off as the Action
# Result
After all these steps, you have a fully automation do not disturb light. Now, you don’t have to stop there, have some fun with the automations in HA to see what else you can do.
Also, don’t forget to place the Hue light somewhere outside your door so potential meeting-crashers see it. And turn the light red or another color that tells people not to open that door.
Check out the video below, where I have Home Assistant on the left - showing my do not disturb light, and MuteDeck with Zoom on the right: https://youtu.be/18nOxUprx6I (opens new window)
How awesome is that?!
I’d love to hear from you when you run Home Assistant or another home automation solution.