# How to Make Webinars People Actually Want to Watch
A great webinar defines a clear goal, solves a specific problem for a specific audience, and gets the tech right. You have to nail those first two before you think about the rest.
Without a purpose and a person in mind, even the slickest presentation will fall flat.
# Defining Your Webinar's Goal and Audience
Before you open a slide deck, figure out why you're hosting this webinar. This single decision shapes everything that follows, from the title to the call to action.
An unfocused webinar wastes everyone's time.
Your goal needs to be specific and measurable. If you're trying to generate leads, a good goal is "Generate 50 marketing qualified leads." If it's for customer education, use something like "Onboard 25 new users on our latest feature."
# What Is Your Webinar's Purpose?
Get concrete. "Brand awareness" is too vague. Frame your purpose around a clear outcome.
- Lead Generation: You attract new prospects into your sales funnel with valuable content. The presentation is built to capture interest and qualify potential customers.
- Product Demos: You're showing how your product solves a real problem. It's less about listing features and more about demonstrating real-world value.
- Customer Onboarding & Training: You help new customers get started or teach existing ones how to use advanced features. The goal is retention and user success.
# Who Are You Talking To?
Once you have your goal, you need to know who's on the other side of the screen. Build a simple audience persona. Answer a few questions.
What is their job title? What company size do they typically work for? What is the single biggest problem related to your topic that keeps them up at night?
Understanding this person’s pain points and knowledge level prevents you from creating generic content. Your webinar will feel like a solution, not another sales pitch. For instance, a webinar for CFOs about financial forecasting will use different language and examples than one for marketing interns about social media analytics.
This targeted approach pays off. While 91% of B2B professionals say webinars are their most valuable content type, most events are small. Webinars with fewer than 100 sign-ups often see a 10.3% higher live attendance rate.
That stat, which you can find in this in-depth analysis of webinar statistics (opens new window), suggests a focused message to a niche audience drives better engagement. It's about quality, not quantity.
# Choosing a Format and Structuring Your Content
A webinar isn't just a long Zoom call. The format you choose dictates the energy of the event and how your audience connects with your message.
A single-speaker presentation is good for a deep dive into a niche topic, but it can feel flat if the presenter isn't experienced. A panel discussion brings in different perspectives but can become chaotic without a strong moderator.
# Picking the Right Webinar Format
Your choice needs to align with your goal. If you're walking people through complex software, a solo presenter is a good bet. If you’re tackling big industry trends, a panel discussion adds credibility.
Think about what each format does best.
| Format Type | Best For | Pros | Cons |
|---|---|---|---|
| Single-Speaker Presentation | Focused educational content, deep dives, tutorials. | Simple to organize, clear focus on one expert. | Puts all pressure on one person to be dynamic. |
| Interview Style | Storytelling, making complex topics relatable. | Conversational and natural, less intimidating for the expert. | Relies on good chemistry between host and guest. |
| Panel Discussion | Exploring industry trends, debating a topic. | Offers diverse viewpoints and adds credibility. | Needs a skilled moderator to keep it on track. |
| Interactive Q&A | Building community, addressing customer pain points. | Highly engaging, directly serves the audience's needs. | Can be unpredictable; requires quick thinking. |
Match the format to the goal. Don't just default to what seems easiest.
A huge mistake I see is defaulting to a single-speaker format because it feels like less work. An interview or a panel can be much more engaging for your audience and is often worth the extra coordination.
# Building a Simple Content Structure
Once you’ve settled on a format, you need a story. A solid structure is your roadmap—it keeps you on track and prevents your audience from getting lost or bored.
Most effective webinars follow a simple three-act flow. It works.
# The Hook (Your First 5 Minutes)
You have a tiny window to earn their attention. Start with a bold claim, a surprising stat, or a problem everyone in your audience recognizes. Your only job here is to convince them to stick around for the next 10 minutes.
Instead of a boring agenda slide, try a direct question. For example, "What if you could cut your weekly reporting time in half without missing a single key insight?"
# The Core Content (30-40 Minutes)
This is the meat of your presentation—where you deliver on the promise from the hook. Break your main topic into three to five digestible chunks. For each one, teach a core concept, show a real-world example, and then connect it back to solving their problem.
This is also the place to drop in an interactive poll or two. It's a simple trick that wakes people up and pulls them back in right when their attention might wander.
# The Call to Action (Your Last 5 Minutes)
End with a single, clear next step. Don't trail off with a "thanks for coming." Tell them exactly what you want them to do next.
Make it specific and easy: "Download the complete checklist from the link in the chat," or "Book a 15-minute strategy call with our team." Give them one thing to do, and make it impossible to miss.
# Setting Up Your Tech for a Seamless Broadcast
Bad tech can derail a great webinar. No one cares about your insights if all they hear is robotic audio or see a frozen screen. Getting your setup right isn't about expensive gear; it's about reliability and control.
Your webinar platform is the foundation of your broadcast. You have dozens of options, and the right one depends on your format and budget. Some platforms are built for massive audiences with complex polling, while others are better for smaller sessions.
Before you commit, make a shortlist and test each one. Pay attention to the presenter's interface. Can you easily manage a Q&A, launch a poll, and share your screen without fumbling through clicks? We put together a deep-dive into popular webinar software (opens new window) that shows how the major players stack up.
# Your Hardware Checklist
Once you've picked a platform, focus on your physical setup. You don't need a full production studio, but a few key pieces of hardware will make a massive difference.
- Microphone: Your laptop’s built-in mic won't cut it. A solid USB microphone like a Blue Yeti or Rode NT-USB+ (opens new window) provides clear audio and is easy to set up. Bad audio is the #1 reason people drop off a webinar, so this is the best place to invest $100-150.
- Camera: A dedicated webcam, like a Logitech C920, offers a much sharper image than your laptop's built-in camera. Good video helps build a connection with your audience.
- Lighting: You don't need professional lights. A simple ring light placed behind your webcam is enough to eliminate shadows. Facing a window with good natural light often works just as well.
This simple flowchart breaks down the core structure of any webinar's content.
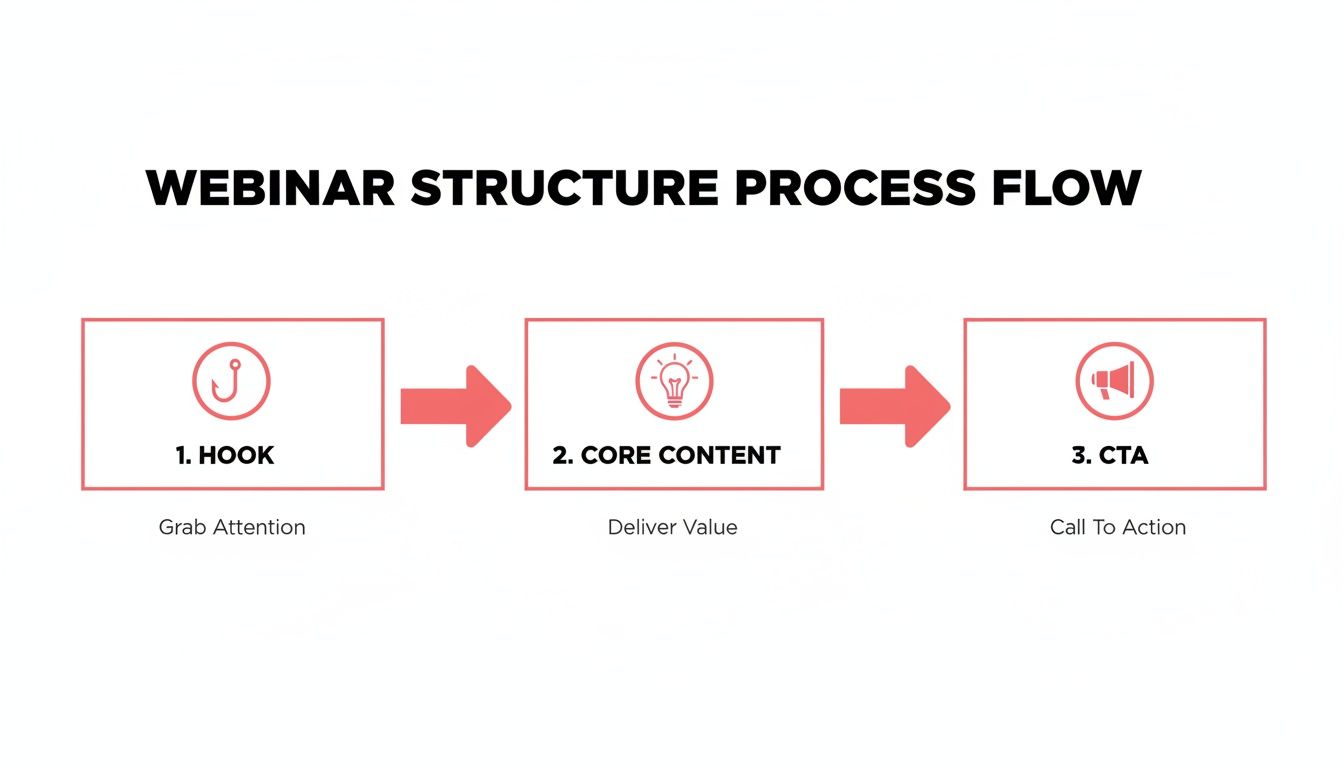
It’s a good reminder that no matter how slick your tech is, your presentation still needs to follow a logical path—from grabbing attention to prompting action.
# Streamlining Your Workflow with Hardware Controls
Fumbling for the on-screen mute or camera button breaks your flow and makes you look unprepared. This is where dedicated hardware controls can help.
Tools like an Elgato Stream Deck (opens new window) or a Loupedeck (opens new window) let you map key actions to physical buttons. When paired with a utility like MuteDeck, these devices give you universal, one-touch control over any webinar platform.
One tap of a button can mute your mic, turn off your camera, or start a screen share, whether you're in Zoom, Teams, or Google Meet. You never have to hunt for the right on-screen control again.
This creates a smooth, professional experience for your audience. You can even use a foot pedal for hands-free muting while you’re typing or gesturing. This is how you run a webinar without the constant distraction of managing the software.
Finally, do a quick network check. Always use a wired Ethernet connection if you can; it's more stable than Wi-Fi. Run a speed test to make sure you have at least 10 Mbps of upload speed. If your connection is shaky, have a mobile hotspot ready as a backup.
# Promoting Your Webinar to Fill the Seats
You could have the most polished presentation in the world, but it means nothing if no one shows up. Your promotional strategy is what turns a great idea into a room full of attendees. This starts with a registration page.
Your landing page has one job: get people to click "Register." It needs to quickly answer three questions: What will I learn? Who is this for? When is it? Use bullet points for the key takeaways, add speaker bios to build credibility, and make the registration form impossible to miss.
# Creating Your Promotion Timeline
Timing is everything. Announce your webinar too early, and people forget. Announce it too late, and you won't build momentum. For most events, the sweet spot is kicking things off two to three weeks out.
Here’s a simple timeline you can adapt:
- 2-3 Weeks Out: This is your launch. Announce the webinar to your email list and post it across all your social media channels.
- 1 Week Out: Send a "first reminder" email. On social media, share a short video clip of a speaker or a sneak peek of a key slide to build curiosity.
- 3 Days Out: Send another reminder email. This time, highlight a specific piece of information attendees will get.
- Day Of: A final email sent 1-2 hours before you go live can drive a surprising number of last-minute sign-ups.
That final push catches procrastinators and people who saw your earlier posts but didn't commit. Don't skip it.
A common mistake is treating promotion like a one-and-done announcement. The best results come from a steady drumbeat of reminders that build anticipation and keep your event top-of-mind.
# Using Email and Social Media Effectively
Your email sequence is your most powerful promotional tool. It should do more than just announce the date and time. Use your emails to tell a story and prove the value you’re offering.
Your first email can announce the topic and speakers. The next one could share a startling statistic related to the problem you're solving. The final reminder should create a sense of urgency.
On social media, go beyond posting a link to the registration page. Since webinars are a video-first medium, learning to master video marketing for social media (opens new window) can make a difference in filling those virtual seats. Create short video teasers, design speaker quote graphics, or run a poll asking your audience what they want to learn. This promotes the event and makes your audience feel involved before it begins.
# How to Rehearse and Prepare for Event Day
Your final run-through separates a smooth delivery from a chaotic one. A good rehearsal isn’t just about reading your slides out loud—it’s about pressure-testing every element of the live event before an audience shows up.
This is your chance to catch awkward transitions and technical hiccups now, not when a hundred people are watching. The goal is to build muscle memory so you can focus on your delivery, not which button to click.
A full technical dry run is non-negotiable.
# The Full Technical Dry Run
Grab your co-presenter, a panelist, or a colleague and run through the entire webinar exactly as you plan to on event day. This isn't a content review; it's about the mechanics.
- Test every piece of tech. Check your microphone levels, camera framing, and lighting. Is your internet connection stable? Plug into a wired connection if you can.
- Practice screen sharing. Go beyond sharing your slide deck. Share a browser window or a specific application. Make sure there’s no lag and that everything displays correctly on their end.
- Run your interactive elements. Launch every poll. Check that the Q&A feature works. If you’re using breakout rooms, practice moving people into them and bringing them back.
This rehearsal will almost always uncover some small issue—a setting you missed, an audio source that wasn't selected, or a slide that doesn't render correctly. Finding these problems now is a relief.
For a complete look at the entire process, our guide on how to do a webinar (opens new window) from start to finish is a good resource.
# Create Your Run-of-Show Document
Your run-of-show is your playbook for the live event. It’s a simple document that scripts every segment, complete with timing cues and assigned roles.
Think of it as a minute-by-minute schedule.
Your run-of-show document turns a potentially chaotic live event into a structured, manageable process. It tells everyone what's happening, when it's happening, and who is responsible for it.
A simple run-of-show might look like this:
- 0-5 mins: Host kicks things off with intro music, a welcome message, and housekeeping notes (where's the Q&A, will there be a recording?).
- 5-20 mins: Presenter 1 covers Topic A. They'll launch Poll #1 at the 15-minute mark.
- 20-35 mins: Presenter 2 takes over for Topic B and shares a live software demo.
- 35-45 mins: Q&A session, moderated by the host.
Finally, prep your physical space. Put a sign on your door, silence your phone, and close every unnecessary application and browser tab on your computer. Have a glass of water nearby. These small things clear the way for a focused delivery.
# Repurposing Your Webinar Content After the Event
The work doesn’t stop when you hit “End Meeting.” The real value of that hour-long session comes from what you do next. Your first move should be to get the on-demand recording out to everyone who signed up.
Don't blast the same email to your entire list. A little segmentation helps. Split your list into two groups: people who attended, and people who registered but were a no-show.
- For attendees: Send a "thank you" email. Include the recording link and any resources you promised. This reinforces the value they got from attending.
- For no-shows: Frame your email with a "sorry we missed you" angle. Give them the recording so they can catch up on what they missed.
This simple tweak makes your follow-up feel more personal.
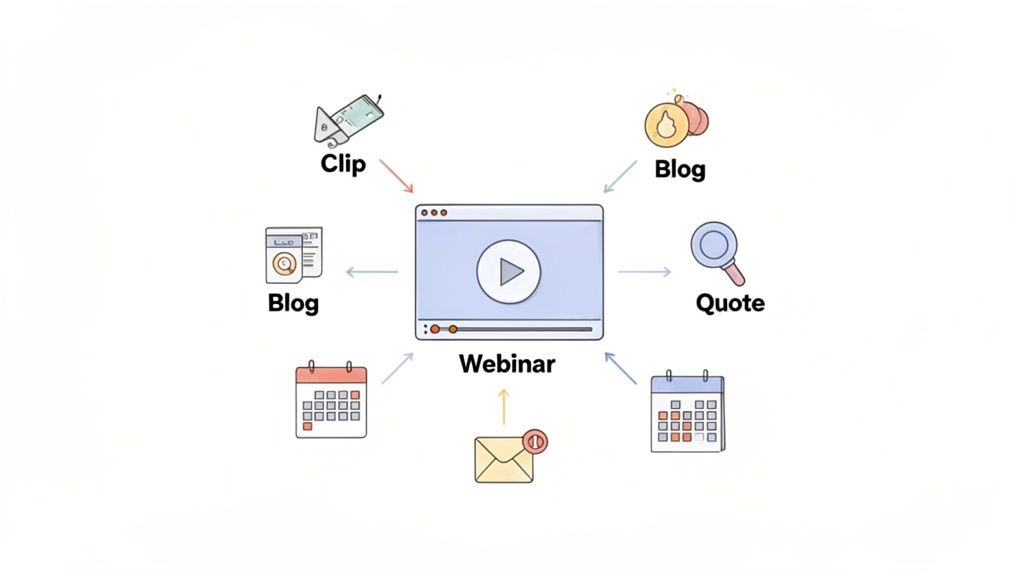
# Extend the Lifespan of Your Content
That one-hour recording is a goldmine. Think of it as a primary asset that can be sliced and repackaged into smaller pieces of content. This extends its reach far beyond the live audience.
A smart first step is to convert video to transcript (opens new window). Having the text makes your material more accessible and simple to repurpose into blog posts and social media updates. Once you have that transcript, the possibilities open up.
The most successful webinar creators move away from a "one-and-done" mentality. They view the live event as the starting point for a cascade of content that fills their marketing calendar for weeks.
For a deeper look at the technical side of this, check our guide on recording a webinar (opens new window) and planning for post-production from the start.
# Practical Repurposing Ideas
Don't let your recording gather digital dust on a landing page. Chop it up and spread it across different channels.
Here are a few ways to get started:
- Create short video clips: Pull out the best 30-60 second highlights, a surprising statistic, or a key takeaway. These are perfect for sharing on LinkedIn, X (formerly Twitter), or as Instagram Reels.
- Write a summary blog post: Use your transcript to quickly write a blog post that covers the webinar's main points. Embed the full video recording in the post for anyone who wants to go deeper.
- Design quote graphics: Grab the most powerful quotes from your speakers and turn them into shareable images for social media. These are low-effort, high-impact assets.
- Build a downloadable guide: Expand on the webinar’s core concepts, add a checklist or a worksheet, and offer it as a downloadable PDF to capture more leads long after the event.
The webinar market is growing, but getting people to show up live is getting tougher. While 85% of businesses see webinars as an essential part of their strategy, live registrations have dipped slightly. This trend means on-demand viewing and repurposing your content are more important than ever. You can dig into more data on these trends in this detailed industry report (opens new window).
# A Couple of Common Questions
People always ask about the little details that can make or break a webinar. Here are two of the big ones.
What's the ideal webinar length?
The sweet spot is almost always 45 to 60 minutes. That gives you enough time to dig into your topic and still leave a solid chunk for a Q&A session without people starting to check their phones.
If your topic is super niche, a punchy 30-minute session can also work well. Just don't try to cram an hour's worth of content into it.
How should I handle audience questions?
Don't let questions derail your flow. The best way to manage this is to dedicate a specific block of time at the end for a live Q&A.
Encourage people to drop their questions into the chat or the dedicated Q&A box as you go. If you can, bring in a moderator whose only job is to organize those questions for you. It's a lifesaver. This lets you stay focused on your presentation without getting pulled in a million different directions.
Stop fumbling for controls during your presentation. MuteDeck gives you one-touch, universal hardware control over your mic, camera, and screen share in any meeting app. Run your webinars smoothly and professionally. Try MuteDeck for free at mutedeck.com (opens new window).