# Fix internet connection unstable during Online Meetings
We’ve all been there. Your screen freezes mid-sentence, your audio cuts out, and you become the cliché of remote work. Your first move shouldn't be a deep dive into router settings. You need triage, not a full diagnostic.
Think of it as first aid for your internet connection. The goal is to stabilize the situation in under a minute so you can rejoin your meeting. You can investigate the root cause later.
This is about quick, practical fixes for professionals who can't afford to drop off a call. Let's get you back online.
# Find and Close Bandwidth Hogs
Before blaming your ISP, check what’s secretly running in the background. An unstable connection is often just another application stealing your bandwidth. Cloud sync services are the usual suspects.
Apps like Dropbox (opens new window), Google Drive (opens new window), or OneDrive (opens new window) can decide to sync a massive file at the worst possible moment, immediately crippling your video call. Even music streaming apps like Spotify (opens new window) can use more bandwidth than you’d think.
Here's how to catch them:
- On Windows: Hit
Ctrl + Shift + Escto open the Task Manager. Click the "Network" column to sort by data usage, find the offender, and end the task. - On macOS: Open Activity Monitor and go to the "Network" tab. Sort by "Sent Bytes" or "Rcvd Bytes" to find the greedy app and quit it.
This simple check is surprisingly effective. A random background update is a common reason your meeting just froze.
# Switch to a Wired Connection
If you have an Ethernet cable handy, plug it in. Now. A wired connection offers superior stability, bypassing common Wi-Fi issues like signal interference from your microwave or competing networks in your apartment building.
Key Takeaway: Wi-Fi is for convenience; Ethernet is for reliability. For a client presentation or a big team meeting, a wired connection eliminates a major source of instability.
Plugging in is also the fastest way to diagnose the problem. If your connection instantly becomes stable, the issue is with your Wi-Fi, not your internet service itself.
# Use Your Phone as a Hotspot
When your home internet fails, your phone is your lifeline. A mobile hotspot can get you back online in seconds, turning a meeting-ending disaster into a minor hiccup.
But don't wait for a crisis to figure out how it works.
Practice it. Once a week, connect your laptop to your phone’s hotspot for a minute. Make sure you remember the password and the steps. This prep work means you can rejoin the call and say, “My main internet dropped, but I’m back.” It shows professionalism, even when your tech fails.
# Finding the Real Source of Your Unstable Connection
When quick fixes don’t work, you have to find the real culprit. An unstable internet connection almost always boils down to one of three things: your Wi-Fi signal, your router, or your Internet Service Provider (ISP).
Work through them systematically, starting inside your house and moving outward. This isn’t about running complex network diagnostics; it’s about gathering simple evidence to figure out where the weak link is.
# Hunt for Wi-Fi Dead Zones
First, map your Wi-Fi coverage.
Grab your laptop and walk around your workspace. Keep an eye on the Wi-Fi icon in your taskbar and watch how the signal bars drop as you move away from the router or behind certain walls. You’ll quickly find the strong spots and the dead zones.
Physical objects are the enemy of a good wireless signal.
- Dense Materials: Concrete, brick, and thick plaster walls are notorious signal killers.
- Appliances: A running microwave oven operates on the same 2.4 GHz frequency as some Wi-Fi bands and can interfere with your connection.
- Metal: Large metal objects like filing cabinets or refrigerators can reflect and scatter Wi-Fi signals, creating dead spots.
If your desk sits in a spot with only one or two bars of signal strength, you’ve probably found a major reason for your connection problems.
# Check Your Router's Health
Your router is the traffic cop for your home network. If it’s old, running on outdated software, or just needs a reset, it won’t direct traffic well.
Start with a proper reboot. Don't just tap the power button. Unplug the router from the wall, let it sit for a full 30 seconds, and then plug it back in. This gives its internal components time to fully reset and clear out glitches.
Next, check for firmware updates. Router manufacturers regularly release these to patch security holes and improve performance. Log in to your router’s settings (usually through a web browser) and look for a section called "Firmware Update" or "Router Update." Installing the latest version can solve random connection drops.
An outdated router is a classic cause of unstable internet. If yours is more than 4-5 years old, it might struggle with modern video calls and a house full of devices, no matter how fast your internet plan is.
# Run Smart Speed Tests
A single speed test doesn't tell you the whole story. The patterns provide the real information. To figure out if the problem is with your ISP, test your connection at different times of the day.
Run a speed test in the morning, another in the afternoon, and one more during peak evening hours (8-10 PM).
If you consistently see a major drop in speed and a spike in your ping time every evening, the issue is almost certainly neighborhood network congestion. This happens when everyone in your area gets online at once, slowing down the shared connection.
Documenting this pattern gives you solid evidence to take to your ISP. This data helps differentiate a temporary hiccup from a chronic service issue, which is important if you use internet-based phone services. To learn more about this technology, you can find information on the best internet telephone service (opens new window) options available.
By methodically checking your Wi-Fi, router, and ISP performance, you stop guessing and start diagnosing. This evidence tells you if the fix is a simple router repositioning or if it's time to talk with your provider.
# Building a Rock-Solid Home Network for Meetings
You've pinpointed the weak spots. Now it’s time to move from frantic, mid-call fixes to building a home network that can handle the grind of daily video calls. This isn't about buying the most expensive gear; it's about smart, targeted upgrades that deliver stability when you're live on camera.
The single best thing you can do? Go wired. Plug your main work computer directly into your router with an Ethernet cable.
Wi-Fi is convenient, but it’s also vulnerable to interference from your neighbor’s network, your microwave, and the walls in your house. An Ethernet cable bypasses all that chaos, giving you a direct, stable pipeline to the internet. If your desk is anywhere near your router, this is the gold standard for a reason. It nearly eliminates drops caused by a flaky wireless signal.
This flowchart is a good way to narrow down where the problem is coming from. It helps you decide whether to check your Wi-Fi, router, or ISP first.
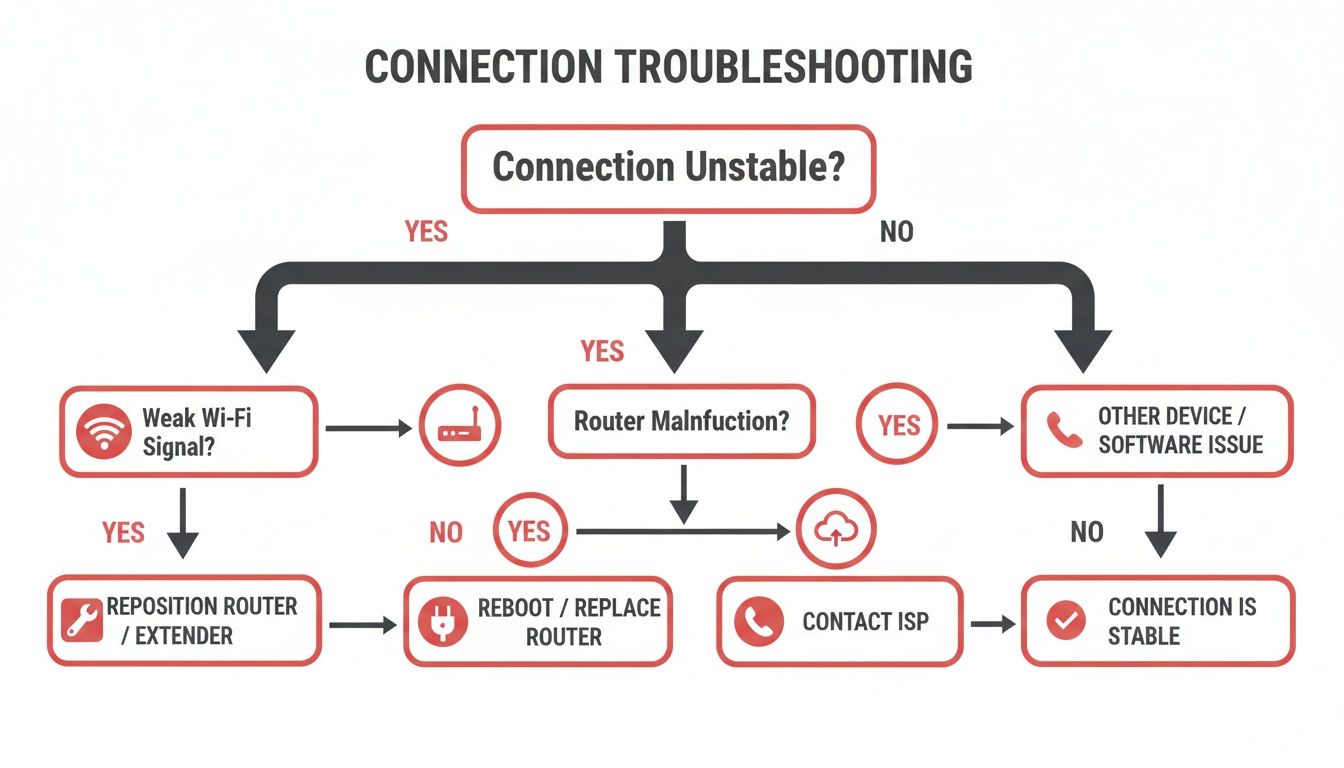
Think of it as a process of elimination. Start with the items closest to you (your Wi-Fi connection) and work your way outward toward your internet provider. It’s the fastest way to find the root cause.
# Giving Your Meetings the VIP Treatment
If you’re stuck on Wi-Fi, you still have options. Most modern routers have a feature called Quality of Service (QoS).
QoS is like a VIP lane for your internet traffic. When you enable it, you can tell your router to prioritize data from apps like Zoom, Microsoft Teams, or Google Meet over everything else. When your network gets busy, your video call gets the bandwidth it needs to stay smooth instead of competing with a background software update.
Another pro move is to find a less crowded Wi--Fi channel. If you live in an apartment building, you're competing with dozens of other networks for the same wireless airspace. Use a Wi-Fi analyzer app on your phone to see which channels are the most congested, then log into your router’s settings and manually switch to a quieter one.
# Upgrading Your Wireless Coverage
If your home has Wi-Fi dead zones, especially in your office space, it's time to extend your network's reach. First, it's worth understanding the basics of choosing a powerful Wi-Fi router (opens new window) that can handle your needs.
Once that’s sorted, your two main options for improving coverage are a Wi-Fi extender or a mesh network.
- Wi-Fi Extender: A budget-friendly fix for a small, specific dead zone. If your home office is at the far end of the house and the signal is weak, placing an extender halfway between the router and your desk can solve the problem.
- Mesh Network: This is the heavy-duty solution for larger homes or multi-story houses. A mesh system replaces your single router with multiple "nodes" that work together to blanket your entire home in one seamless Wi-Fi network. No more signal drop-offs as you walk from room to room.
So, which one is right for you?
# Wi-Fi Extender vs. Mesh Network
| Feature | Wi-Fi Extender | Mesh Network System |
|---|---|---|
| Best For | Small, specific dead zones (e.g., one room) | Whole-home coverage, larger or multi-story homes |
| Setup | Simple plug-and-play | More involved, but creates a single network |
| Performance | Can cut bandwidth in half; creates a separate network | Consistent speed and seamless roaming across the house |
| Cost | Budget-friendly | More expensive upfront investment |
An extender is like patching a small hole, while a mesh system is like repaving the entire road. Both can work, but a mesh network is the superior choice for a reliable, whole-home setup.
Getting your physical environment right is a large part of the battle. For more on that, check out why it's so important to have a dedicated work-from-home space (opens new window) to complement your network upgrades.
# Smart Adjustments Inside Your Meeting Apps
Sometimes the problem isn’t your network. The issue is your meeting software demanding more from your internet connection than it can give. When your connection falters mid-call, you can make adjustments right inside the app to reduce its bandwidth needs and get things stable again.
The single most effective change? Sacrifice your video to save your audio. High-definition video streams are massive data hogs. The moment you notice stuttering or lag, your first move should be turning off your own camera. It’s a quick way to show you're prioritizing clear communication over being seen.
Next, attack the incoming video. Most meeting platforms let you stop seeing other participants' video feeds, which cuts down on the data your computer has to download. In Zoom (opens new window), you can right-click a participant's video and select "Stop Video." In Google Meet (opens new window), open the participant list, find a name, and choose "Don't watch." This simple step can rescue a call on the brink of collapse.
# Fine-Tune Your Video Settings
Even when your connection is behaving, you can preemptively lower your bandwidth use. Dig into your meeting app's settings and find the video quality options. Disabling the "HD" or "High-definition" setting for your camera is a smart move if your connection is chronically unreliable.
Your colleagues won't notice a slight drop in your video resolution, but they will notice if your audio keeps cutting out. Prioritizing audio is always the right call.
This tells the app to send a lower-quality video stream, which requires less upload bandwidth—often the weakest link in a home internet connection. Making this a default setting can prevent problems before they start.
# Rethink How You Share Information
Screen sharing is another major bandwidth consumer, especially if you're sharing high-resolution images, videos, or anything with a lot of on-screen movement. When your connection feels shaky, find an alternative.
Instead of sharing your entire screen to show a document, share a link to it in the chat. Let everyone open it on their own machines. This shifts the bandwidth burden from your unstable connection to theirs.
For presentations, try these workarounds:
- Pre-load materials: Send your slide deck to participants before the meeting begins.
- Use low-bandwidth sharing: If you must share, choose to share just the specific application window (e.g., only PowerPoint) instead of your entire desktop. It’s more efficient.
- Appoint a co-host: If you're leading a critical meeting, ask a colleague with a stable connection to be your backup. They can share the presentation for you if your internet starts to act up.
These in-app adjustments give you more control when your connection is unpredictable. Mastering them is a key skill, and you can learn even more by reading our ultimate guide to productive Zoom meetings (opens new window).
# Building a Fail-Proof Setup for Critical Calls
For most of us, an unstable internet connection is just annoying. But if your career depends on solid video calls—sales presenters, online tutors, or live translators—it's a critical point of failure. When a single dropped call can lose you a client, you need a setup that prevents problems instead of just fixing them.
This is about building a professional-grade communication environment.
We’ve all been in that nightmare scenario: you’re mid-presentation, and your connection dies. Your screen share is frozen, your audio cuts out, and the awkward chorus of "I think we lost them" begins. This isn’t just a personal frustration; it’s a global problem.
Even as global internet penetration is expected to hit 68.8% by 2025, flaky connections are still a challenge. The digital divide is real, with urban areas often enjoying connectivity 2.7 times faster than rural ones. You can find more stats on the state of global internet at sqmagazine.co.uk. For anyone who relies on video, that gap can make or break a meeting.
# Creating a Bonded Internet Connection
The ultimate safety net is a setup with no single point of failure. This is where bonded internet comes in. Instead of depending entirely on your home broadband, you combine it with a second, independent connection—usually a 4G or 5G cellular hotspot.
Specialized hardware or software monitors your main connection. The second it detects a drop in quality or a complete outage, it automatically fails over to the cellular backup. The switch is so fast your meeting attendees will never know it happened.
This kind of tech used to be reserved for corporate IT departments, but now it's accessible for home office pros who need that extra reliability. It’s an investment in your professional image and peace of mind.
# The Power of Physical, Independent Controls
Even with a flawless internet connection, your meeting software can still fail. Imagine your app crashes, but your microphone is still hot. You can't click the on-screen mute button because the entire interface is frozen. This is where physical, independent meeting controls are a lifesaver.
A dedicated, physical mute button is a game-changer. It works at the system level, controlling your microphone directly, regardless of whether Zoom or Teams has frozen. It’s your emergency brake.
Tools like the MuteDeck (opens new window) software, paired with a device like an Elgato Stream Deck (opens new window), give you this power. You get a tactile button that's always in the same spot and always works. It cuts off your actual microphone input, not just the software button. This simple tool can prevent cringeworthy moments when your tech inevitably glitches out.
Building a fail-proof setup is about anticipating what could go wrong. By combining a redundant internet connection with independent hardware controls, you create an environment where you can present with confidence, knowing a flaky app or a bad connection won't derail your most important conversations.
# Still Dealing With a Shaky Connection? Let's Talk Specifics
Even after you've tried the usual tricks, some questions about your internet’s behavior might still be floating around. Here are straight answers to common head-scratchers that pop up when video calls go sideways.
# Why Does My Internet Only Seem to Drop During Video Calls?
This one’s a classic. Video calls are uniquely brutal on your internet connection. When you stream a movie, your computer can download chunks of data in advance (buffering) to smooth over brief dips in your connection. You never notice them.
A video call is a constant, real-time, two-way street. There's no buffer. Your device is sending and receiving a steady stream of data, and any tiny hiccup that would be invisible while browsing the web instantly becomes a frozen screen or robotic audio. A video call is the ultimate stress test for your network.
# Will Throwing Money at a Faster Internet Plan Actually Fix This?
Not necessarily. Upgrading to a more expensive, higher-speed plan often misses the real problem. A connection’s speed, measured in megabits per second (Mbps), is not the same as its stability.
For video calls, a slower but rock-solid connection is always better than a blazing-fast one that’s prone to dropouts.
My Advice: Before you call your ISP to upgrade, check your gear. If your router is more than four or five years old, it could be the bottleneck. The same goes for a weak Wi-Fi signal in your office. A simple wired Ethernet connection, even on a slower plan, will almost always beat a faster but flaky Wi-Fi signal.
# Can My VPN Be the Reason My Connection Is So Unstable?
Yes. A VPN adds an extra leg to your internet traffic's journey. It has to encrypt your data and route it through a server that might be hundreds or thousands of miles away before sending it to its final destination.
This process adds latency (delay) and introduces another potential point of failure. If you’ve been battling connection drops, try this simple test: disconnect from your VPN right before your next meeting and see if things improve. The difference is often immediate.
If you want to go deeper into the technical side, you can find further insights on common connection issues (opens new window) on blogs that dig into network behavior. It can help you get a better handle on how different tools are affecting your connection.
When your internet is acting up, the last thing you need is to be hunting for the mute button in a frozen app. MuteDeck gives you physical, reliable buttons for your mic, camera, and more that work even when your meeting software is struggling. Take back control by visiting https://mutedeck.com (opens new window).